Sunday, 1 March 2015

Photographing Children – Observations and Documentation

Hi all,

Observations and documentation are a regular, daily occurrence in the lives of teachers working with children. There are plenty of ways to go about it; learning stories, anecdotal records, running records, parent postcards and plenty of others. With all these different ways of approaching how to document your student’s experiences and progress, it’s easy to find one that works well for you, your classroom and your student’s parents however they all have one thing in common, photos.

Recently, I have seen a push towards more visual oriented observations. In an early childhood settings, these can be seen in display book portfolios, shown proudly on group display boards and handed out in the staff room for inspiration. The rationalisation is that parents are more likely to engage with these observations because they are quick to decipher; you simply need to look at the photo and the words are put into context. In a recent primary placement, the visual element to documentation was imperative; many of the families at the school were immigrants and refugees which made text heavy communication difficult due to language barriers.

So here it comes to the part of putting together the most important part of the observations, the photos. Photographing children doesn't seem too difficult but it is important for the photos to seem genuine and authentic. I typically use 3 types of shots that help to vary the types of photos you can include in your documentation…

Work in progress
I feel like this angle really lets the viewer see what the child is doing and the focus is on their action, preferably the one you are documenting. It works for a range of activities and actions and doesn’t distract the child from their task.  


 Birds eye view
These photos are great if you want to capture a play setup, piece of art or group interaction. The frame is filled up with the play the children are engaged with and often, their interactions with each other.  


 From my perspective
In this photo, you are seeing exactly what the child is seeing and what they are choosing to do with the materials in front of them. This shot is great for documenting the journey from blank slate to finished product, capturing the child’s process in between.


So long as the photos you choose to capture are focused on the child and their play, there is no wrong way to photograph children. Not only do these shots capture the essential but they can also be tweaked so that the photos are non-identifiable, in order to be shared in the public forum.

Happy snapping!  


Miss Tracy xx

Sunday, 22 February 2015

Watch this Space!

Hello again readers,

If you’re still with me, you can’t have missed the fact that I have been extremely absent over the last 4 months. While I love maintaining and contributing to this blog, real life tends to get in the way and I was finding it incredibly difficult to keep up with my post schedule. Rather than put you through the trouble of reading incomplete and under developed posts and anecdotes, I decided to take a break.

During those 4 months I did get up to many different things. I took on more tutoring students, mainly aged 11-14 in grades 5-8 and took on more shifts and my part time job with Kumon Australia. My course requirements last semester seemed to get bigger and bigger and the assignments began to get more spaced out and weighted heavily on my final grades. After undertaking my first mathematics unit, I have a new appreciation for what is expected of students and am yet to see a more intense problem book then what I had to submit at the end of semester.

A new addition to my semester was a Community Engagement experience. This is another placement unit where we were expected to dedicate our time to the community, as outlined by this paragraph supplied by ACU…
“Pre-Service Teachers are required to complete a Community Engagement Program (CEP) comprising 10 days or 70 hours in an approved community placement.  The experiences gained should enable the Pre-Service Teachers to work collaboratively with community groups and organisations to achieve mutually agreed goals that build capacity, improve well-being and produce just and sustainable outcomes in the interests of people and communities. An aim of the CEP is to expose the Pre-Service Teachers to diverse contexts that will promote critical reflection about their values and beliefs and provide opportunities for them to contribute to the life of the community.”
I can honestly state, without a doubt, that this placement was life altering. I chose to complete my CE in a primary school located in a low income area, heavily populated by refugees from Sudan and Vietnam. For 5 hours once a week, I worked as a teacher’s aide with the ICT and library department. The amount of support and recognition I received while in this position by the students, staff and wider community was beyond expectation.  The teacher’s saw beyond my volunteer title and found ways to integrate me into the daily classes, to help with assessments and even teach some classes. While in the library, I had the opportunity to learn about the preparation and cataloging system, how books are selecting and used in classes and the importance of weeding out books.
Towards the end of the term, I worked with the principal and key support staff to develop an inaugural ‘Transition to Prep’ for the school, which looked at how we could develop some key social skills in the children before they started school. After continuous and ongoing planning and some bumps in the road, the program went ahead. While it had a shaky start, by the end of the two months, the change in these children was astonishing. They were getting along with their new friends, learning how to express themselves and their emotions in healthier ways and developing a relationship with the wider community which would become their school this year.
This and my time as an aide have left me with a range of new skills and attitudes towards education and working with children, which I doubt I would have developed on a regular placement. Once placement and the semester came to an end, things outside of uni became to get hectic. With the holidays upon me, my schedule was packed and there was so much to do leading up the Christmas and my uni break. Fast forward to February and here we are!
So here I will leave you with the promise to return regularly, once a week, with a well written and relevant posts relating to my journey studying education and learning to become an educator. Until next time,


Miss Tracy xx 

Wednesday, 10 December 2014

Semester 4 Grades

Hi everyone,

Grades have been emailed out today and here's how they stand this semester...


I will admit that these are not my best so far; they aren't the worst but there is some serious improvement to be made and some dedication and commitment to happen next year.

Stay tuned,

Miss Tracy xx 

Sunday, 28 September 2014

Weekly Planning

Hello!

With full control in full swing, it was expected during my placement that I plan for one week and implement for two days. I had seen my AT's weekly plan up every week I was at placement so I knew the expected format and sat down with her to discuss what the expectations for the week were.

As you may have noticed, many of the environments and experiences I have been writing about on here have focused on the letter P, this being because during my full control week, the focus letter was P. The following was my plan for the week...


I accounted for weekly activities, such as sport and yoga, some activities that my AT had in mind and some general planning included every week. The focus on Literacy and Numeracy was part of my AT's original format. It's not how I would probably set out my plan but it was interested to use these as a focus.

The hardest part of constructing this was having all these great ideas for the children and the room but having to find somewhere to link it and aligning these with the children's interests. The research that went into coming up with this plan was so fun and one of my favourite parts of the job. Using other blogs, Pinterest, Tumblr I found heaps of ideas incorporating the letter P and the children's current interests and favourite experiences and then planned these around the routine and timetable of the room.

As the week progressed, I wrote little notes onto the plan, which is displayed above the children's cubbies for parents to view. I wrote the date they were implemented, whether or not it was sucessful and whether I would be doing an observation or learning story for the experience. These annotations helped the parents see what was happening throughout the week and my AT see how I was progressing and following up on my planning and programming.

As a result of this planning, my full control was successful and I learned heaps of new things and really began to see myself as an early childhood educator rather than just a visitor or student.

Keep your eyes peeled for more about my time in full control!

Miss Tracy xx

Sunday, 21 September 2014

Placement - Planned Experiences Part 8

Hi there!

Still trying to capitilise on all the rich experiences I had on placement, today's post is about how to make and use puffy paint! Again with the letter P theme, my AT's idea was to create the paint and set them up on our art and craft table.

The recipe for creating the paint is super simple, with things you can readily find in your kitchen or supermarket.
Puffy Paint
1 cup flour
1 cup salt 
3 cups water  
Paint

Mix all the ingredients together until they form a batter-like consistency. Depending on how many colours of paint you would like to make, separate into your chosen containers that the children will use to paint with (see note). Add a small squirt of paint to each mixture and mix until you see the desired colour appear and then you're ready to go!


I used zip lock bags with a smal hole cut out from a corner for the children to paint with. While there was no problems using these, they were very flimsy and some children had difficulty using the bags to 'pipe' the paint. I would suggest using old sauce bottle or buying a new set as they are easier to hold and could have plenty of other uses in the classroom, not just for this activity. 

The other thing I noticed when I tested it at home was that normal paper would get soggy under the batter and would rip, tear or start to break down. For this reason, at the kinder, we used A3 canvas paper that had been halved for the children to paint with. Stiff cardboard or poster paper can substitute if you don't have or can't find this. 

Once I had set up the activity after afternoon tea, the children were very eager to see what was happening. My AT and I had to show a few children how to hold and press the bag, but they were very eager to get painting...


Now the magic happens! After the children had completed their painting, we set them on the drying rack. During their outside play time, I went into the staff room and put the painting in the microwave for 30-60 seconds depending on how much paint was on the paper. The flour and salt cook leaving the paint raised and very bumpy. 

The children loved the change and how different it felt. Some even compared the picture to the paints by feeling one and then the other. This was a really fun and engaging activity and could be used with younger or older children. Give it a try in your classroom and let me know how it goes!

Miss Tracy xx

Sunday, 14 September 2014

My Early Childhood Educational Philosophy

Hi!

Last semester, I had to complete on of the most difficult and thought provoking assignments to date: to put into words my early childhood educational philosophy.

It took a lot of thought and reflection, something which I continue to struggle with, but in the end, I managed to get it into words. I took some inspiration from my previous placement centres and looked online to see others and even took to academic literature.

This was my final piece of writing...

I believe that quality child care and education begins with the involvement and input of parents and families. Since you are your child’s first teacher, your experiences together and observations are crucial to structuring a program which caters to your child’s interests and developmental needs as they journey through childhood.
The continued observation, documentation of your child coupled with communication and continuity between the home and educational environment allows us as early childhood educators to build a program which meets individual needs, focuses on natural and authentic play spaces and fosters free choice and quality interactions. 
It is important to understand the level of diversity present in our current community and to past these views on to our future generation. To ensure this, all children are treated equally regardless of gender, race, ability, religion, socio economic status or family structure and it is expected that this is extended to their families. As a result of this, a non-gendered approach is taken by all educators when planning and programming environments and experiences.

Learning experiences are informed by the interests and needs of children in the room, observed through documentation. These aim to nurture curiosity, wonder, inquiry, as well as feeling of success, empowerment and confidence. Careful care and consideration is taken when setting these up to ensure the safety of the environment for the children it is designed for while still providing a setting for potential challenge and growth.

The social context of the environment is important to the experience of childhood and is reflected as such in the organisational structure of the rooms at the centre. Children are primarily placed based on their age, in order to provide age and developmentally appropriate experiences however the difference of ages allows for a range of interactions and a chance for cooperative and collaborative skills to emerge and be practiced.

These considerations applied to the environments and experiences designed are informed by the Early Years Learning Framework to ensure that children have the opportunity to:
·         Build a strong sense of identity
·         Connect with and contribute to their world
·         Develop a strong sense of well-being
·         Become confident and involved learners
·         Transition to effective communicators 
While the mark is important, for me this assignment was really setting me up to think about what I value, what I think was important to my approach and what informs my practice. It has set me up be a more reflective practitioner as I am continually told to change this statement and update when necessary.

I'm interested to see how many other teachers put these philosophies into writing, would you consider yourself on of them?

Miss Tracy xx 

Sunday, 7 September 2014

Placement - Creating Environments Part 5

Hello!

Keeping with the children's interest in the home corner, imaginary play and the letter of the week theme, I began to look for some environment ideas during my full control week. After perusing Pinterest, I came up with the idea of creating a felt board pizza!

After a trip to my local Spotlight, a large chain craft store, where I purchased an A4 multi-coloured felt set, an A3 piece of stiff brown felt, I returned home and looked at what exactly goes into a pizza.

I found this pin, which also has some great ideas for other felt board designs, and decided to include the following toppings:

  • cheese
  • ham
  • pepperoni
  • mushroom
  • capsicum
  • chicken 
  • olives 
It was painstakingly difficult to cut out some of the shapes on the felt and because I traced the shapes on the felt with permanent marker you can see the outline where my cutting was a little off but the end result was pretty good...


I thought the pizza box would add a nice touch so imagine the face of our local pizza hut guy when I asked if I could have a clean empty box alongside my thin and crispy super supreme! I added picture and word labels to the toppings box and besides the large mirror sign and sectioned container of toppings, I also added a small notepad and pen so the children could 'take orders'. During their play, one child suggested we add in a phone so people could call and tell us while another suggested we get a car so we could deliver!

From the pictures and observations, it looks like they had a lot of fun...


This set up encouraged the children to talk about what they wanted to have on their pizza, to consider others as they completed order and encouraged them to use letters and words to symbolise any orders on the note pad. They became very adept at sectioning and sorting the ingredients during pack up time and were quick to tell each other how to take care of their new toy.

It was so cheap and easy to make, minor my small embarrassment at Pizza Hut, and the quality of play that occurred as a result was amazing!

Felt and felt boards is definitely something I want to further play around with and experiment with in the future so stay tuned for any new developments!

Miss Tracy xx

Sunday, 31 August 2014

Group Observations and Learning Stories

Hola!

I have shared how I write my individual observations for portfolios and planning on here before but am yet to share group learning stories. I only started writing them this year but they are an incredible tool!

Most kindergarten classrooms ave a space where we educators post what we are doing in the classrooms and pieces of children's work to share with parents and caregiver. this was no different in my placement centre...


Featured on this board are two group learning stories printed on A3 paper and photos taken from the group experiences. Writing a group learning story, I feel, is quite different from writing them for an individual child.

Rather than focusing on the specific, I tend to focus on what all the children are doing, what they are learning, what they all have in common. I also try to include some individual responses, sometime included in the story or by writing/typing them out and sticking them up near posted story. This one was an example from the creek experience I set up earlier in the year...


As always, include lots and lots of photos! I cut mine off the bottom, but taking and selecting group phots is one of the most fun parts of writing these! These group experiences are wonderful to have but even better to document and share with families. Slightly adjusting how we write these isn't too difficult but the end result is completely worth the extra time and effort.

Some key things to remember:

  • keep it general, try not to write about specific children or their responses
  • chose to an experience where about 80% of your students were involved in, not just one or two
  • linking to the curriculum framework is important so think of the learning that happens, what thinking did this inspire, what relationships are being built?
  • link the chosen experience to how you will plan in the future - this is one of the most important aspects!
  • display these printed stories in a well trafficked area and make the presentation appealing to look at - the point of these are to share what happening on the inside with the outside.

Would love to hear from other educators who do these... or are planning to!

Miss Tracy xx
Sunday, 24 August 2014

Placement - Planned Experiences Part 7

Hello!

The letter theme is a big help when it comes to structured planning at this centre and during my full control time, the letter of the week was P. Sensory play has so many benefits and purposes  and the children absolutely love it! With this is mind I went with making play dough with them, with some added extras…

I made the play dough with the children during their quiet time, with each having a turn at pouring and mixing the ingredients. I had arranged the invitation to play in the morning, selecting the following items; pom poms, patty pans, pipe cleaners and paddle pops and decided to dye the dough pink. Are you seeing a reoccurring theme yet?


I never made this theme obvious to the children, I never mentioned why it was pink, the link between the additional items, not once. But they were quick to observe. One child mentioned that we should make it purple because purple starts with P. Another suggested earlier in the week that play dough was a p word so we should play with it soon.


The children had a great time making and exploring with the dough with this being the result…


The end result = a fun play dough experience with strong links to the children's interests and learning goals!

Miss Tracy xx

Sunday, 17 August 2014

The Staff Room

Hi again!

Now, as important as it is for providing for the children in early childhood is providing for the staff. When you have staff who truly work together as a team, support each other within and outside the centre, collaborate ideas and question methods, the quality of the program you are working to provide skyrockets! These sorts of staff relationships and behaviour have to be built and nurtured somewhere, and for most centres this place is the staff room.

At my first placement centre, the staff room was positively tiny however the space in there was set up in a way which allowed traffic to flow through and yet still allowed staff to have a place to come to where they could sit down, unwind and converse. 

In contrast, when I first arrived at my current centre, I noticed they had a significantly large staff room but it was crowded with ill placed furniture. When another director came in, she too noticed this problem and set out to fix it. The current set up has distinct spaces; a table for eating and talking, a small desk to read important updates, read the roster and update the timesheets, two couches for occasional napping and a large table specifically for heating and cooking appliances.

Another update was the staff discussion board. While they are common, they are often not used to their fullest potential, which was the case here until the educational leader rubbed it out completely and redrew. This was the final result…

Staff began writing positive messages on the board; the updates were regular and well communicated and included ways that the staff could improve their practice. The educational leadership update was posted every Wednesday as a result of visiting each room weekly and really looking at what they were doing well and what needed improvements. Sharing concrete and local examples of good practice was so much more meaningful then grabbing examples from online or other centres. If you can walk next door and see what a lovely portfolio looks like rather than having to go research, so much easier! The staff also had a more informal way of communication…


This little exercise book had little notes about how a child was sleeping that day, happy birthday notes and messages letting staff know who appreciated and special they were to the children and to the staff. Staff were very eager to check this book in the mornings and after breaks and loved the opportunity to write and read something in.

These were two changes that came from looking at how the staff room was organised and what the staff at the centre needed to take away from it were extremely effective. Take a look at your staff centres; what do you need, what do you have and how can things be changed?

Keep me updated!

Miss Tracy xx

Sunday, 10 August 2014

Literary Discussions

Me again!

After the children on placement came inside from outside play, we would often sit on the mat and read a story to slow down before having afternoon tea. On day, we decided to A House For Wombats by Jane Burrell and Michael Dugan. I went through a book orientation as we discussed in EDLA this semester, going over the title, the front image and the author's name when I turned the book and... 

THERE WAS NO BLURB!

...and the children in the room immediately noticed. We read through the book, which wasn't too bad, and talked about what happened in the story and what it meant when one child put their hand up and asked if we could write a blurb for the book. So I said yes!

We talked about what was important in the book and came up a list in which the children basically told me absolutely everything which happened in the story. After talking about how the blurb only tells the reader some of story, we whittled down the list after carefully considering each point and how important it was to the story and came up with the following list:

    
" she makes a house
the house changes
the house has stairs
the houses are different 
the wombats fix the house
the wombats sleep
they sit on the couch 
they had a cup of tea "


We were all happy with the final list and decided to print it out and sticky tape the list onto the back of the book so that future readers could read a blurb when they chose to read this book.

Miss Tracy xx

Sunday, 3 August 2014

Graphing in Early Childhood

Hi all,

Inspired by this pin, I planned this activity during my full control period. Preparation included cutting out the pieces of paper and writing the children's names, adding a heading to the page and gathering your glue, scissors and permanent marker.

I sat the children down and began by talking about our other graphs and what we measured on them and what we were going to measure on the new graph. I placed the names on the ground and asked the children to come out one by one and see which one belonged to them.

They then stood out the front and counted the letters in their own name. I then cut out the individual letters and the children all called out what letter I should glue up.

After gluing the letters on, there was some discussion about who had the most letters and who had the least. We also compared whose names had the same amount and the same letters.  

At the end, we counted up the letters in everyone's names and I wrote it in marker down the right hand side. After drawing in the grid lines, labeling the axis and underlining the heading, the final product was ready to be tacked onto the door with our other graphs...      


This activity incorporated so many concepts including:

  • graphing
  • spelling
  • counting 
  • information representation 
  • word recognition 
  • number recognition 
  • comparison and contrast
Definitely one to try out again, perhaps with a little tweaking for the primary placement... 

Miss Tracy xx

Sunday, 27 July 2014

Placement - Creating Environments Part 4

The Doctors Office

The home corner at placement is a little dated. While the furniture is neutral in color and in good condition, the play items in there are no longer extending the children's interests and so I set about looking at how we can change it. I took this photo as part of one of my observations...


The children who usually prefer to play in the home corner moved all the chairs and lined them up against the mirror to make a bed. One girl, E, tucked L into the new bed, using the tablecloth as a blanket and put her hand against her head to check her temperature. She then brought a cup up to L's lips and let her sip. This type of play could have been inspired by the doctor's office some other educators have set up in the 2-3 year old room, where these children spend family grouping in the morning.

Upon watching this, I asked the children if they could change the home corner, what would they put there instead? It was no surprise when they suggested a doctor's office or hospital. If you follow this Pinterest board of mine, you might have noticed a slew of pins awhile back around medical play as I looked online for inspiration. This was the final result...


Using what I could find in the storeroom, what my AT had from their last hospital play area and moving around some furniture, the area began to take shape. A small table with an old desktop computer, a screensaver printed and tacked on, made the reception area while two chairs made up our waiting room. Including the height chart, eye test, light-box and scales made the area seem more authentic. The bookcase which previously housed utensils and cookware, is now labelled (using this font) and displaying the medical equipment of the Whales Kinder Hospital.


The instruments included some from a store bought doctors kits, and three identical jars filled with cotton balls, cotton buds and Popsicle sticks.

The band aids were made with paper cutouts but you can download print the template below onto cardboard or poster paper for the same result.

The bandages are large pieces of beige/cream ribbon cut to size. I would suggest measuring the ribbon around one of the children to see how much is adequate to tie a knot as our ones were only able to be tied around toys.

The patient forms can be downloaded from here, they are a great literacy tool and the pictures make this template perfect for early childhood. Print out about 20 and attach them a clipboard, don't forget to have a cup of pens or pencils handy like we did near our reception desk.

The stethoscope we used was a real medical one and worked, however if you cant find one or are hesitant to use one in the room, there are plenty available in play doctor kits.

The doctor's bag was made using an old cosmetic case and simply painted it black with a large red cross on top.

The blood pressure cuff was made using a recycled plastic screw-top container. On the top, I attached some cord and a cardboard arm cuff with a red cross glued on and from the left/right side, a cord attached ti a partially blown balloon. This was one of the most played with item as the children had seen it at the doctor's but never had the opportunity to see it in use.

The x-rays that we used in this environment came from a set of animal x-rays purchased through Educational Experience and were stored on a clipboard in this cubby when not on display on the light-box.  

This new area of the room was well received by the children, who continued to surprise me with how they chose to play...


Miss Tracy xx  

Wednesday, 23 July 2014

Semester 3 Grades

Hello readers,

It's that time again! My results have been emailed to me and here they are for semester 3...


There is some room for improvement, I wasn't too thrilled about the two credits since I know I could have at least moved them up to distinction. Once again, I have passed my placement, earning a 7 out of 7 on my final report and my Grade Point Average (GPA) currently sits on 5.75.

Seeing that this was my third semester, I had a better chance to do well however having different types of assignments and the manner they were communicated and graded has effected my grades. There's no excuses for next semester, the only way to go is up!

Miss Tracy xx

Sunday, 20 July 2014

Placement - Creating Environments Part 3

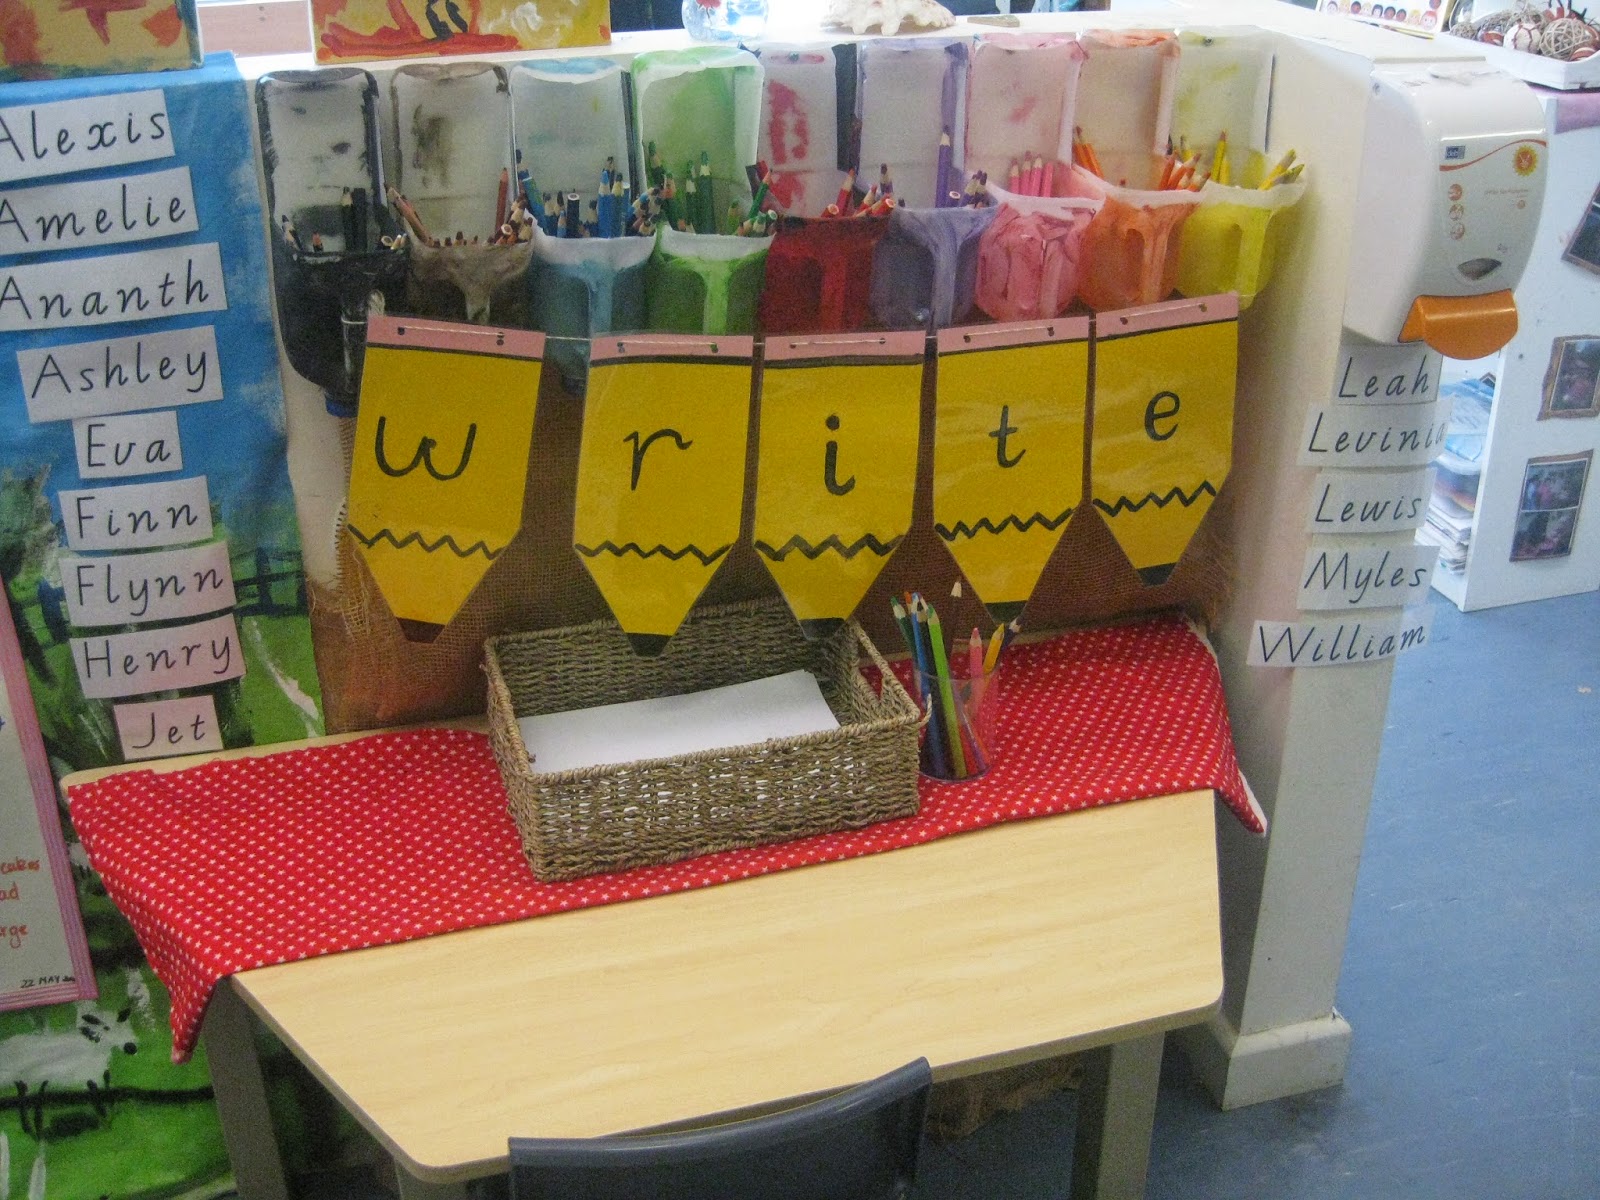
The Handwriting Table 

The children in the kinder room love to write. Some have mastered their names already and write it on every piece of paper they can get their hands on while some of them are still experimenting with what letters they can trace, draw and recognise.

In knowing this, my AT and I have been doing everything we can think of to support this current interest of theirs. When choosing the order to wash hands, put on jackets, get place mats etc. we draw a letter or a name on the board. Some children knew their names and others while others had more fun sorting out the false names from the real ones. During my full control week, I asked the children what their favourite letters were and why for their morning minutes questions and I received some very thoughtful and insightful answers.

When it came time to change one of the activity tables, I had the perfect idea; a writing table!


I got the idea for the banner from here but cut out yellow and pink paper instead and painted on the letters. After laminating, I used a hole punch to punch holes (duh) and strung it up using twine. I had to redo some pencils so that they could match so for your convenience and found at the bottom of the post, I have made a template that you can print out and either write, type or paint the letters onto.  The milk carton pencil holders were my AT's idea and sorts out the pencils by colour. After placing the banner up, setting out a tablecloth and some paper in a natural tray, I set to work on the most important part, the names!

The Victorian Modern Cursive Script font is the best tool you could have installed on your computer. It is the font used in Victoria to teach handwriting and to create handouts, posters, practice sheets...you name it, you can type it with this font! I used the holy grail of fonts to type out the children's names and placed them up around the table with Velcro. I decided on Velcro so that they could recognise and pull off their own names should they need help to spell it or what the letters look like,  and then place them back when they were finished.

From the email I received from one parent, "F has asked me for paper and pencils so that he could write his name at home but when I got it for him, he said he needed the table and the banner to write," the children really enjoyed the new edition to the room and what they can do here!

Wednesday, 16 July 2014

First Birthday!

Can you believe it? It has been one year of blogging already and from a humble Blogger based online blog, I have branched into Tumblr, Pinterest and Twitter, with loyal followers on across all platforms.

When I started this blog, I was looking for a place to document my journey as a pre-service teacher and the placements that coincided with them. I have since found a place to share my ideas and thoughts, a place to share questions and insights and a way to document the chaos that consumes my life!


A big thank you to all my readers and followers; without you, I found not have continued to update and leep the blog going. Knowing that someone is reading this on their computer, next door or across the world, and gaining some sort benefit makes me want to wake up and keep the queue going!

To another year!

Miss Tracy xx 

Sunday, 13 July 2014

Placement - Planned Experiences Part 6

Making Bread

Following some of our group time discussions and the success of the whole grain play dough, I decided to bake some bread with the children. I chose to do it on the Friday, when the children celebrated their 100 days at kinder and make fairy bread out of the final product for them to enjoy at the party.

I bought a Laucke bread mix from my local Woolworths which was only around $1.50 and contained the flour, yeast and instructions on whether you wanted to make it from hand or with the bread maker. I decided to forgo the bread maker so the children could see how the dough changed.


We sat in a large circle during our morning group time and talked about what we could cook in the oven during the Morning Minutes. We then took turns putting the flour into the mixing bowl. Since the pack asked to use hot water, I drew on the measuring cup with a whiteboard marker and the children told me when to stop pouring the water from the kettle. 

After I initially kneaded it, the children each had a feel of the dough and looked for a place in the room to put it so we could watch as the yeast worked its magic. We kept checking back every hour to see how much the dough had grown and it did not disappoint! They loved poking the dough and hearing the air hiss out and comparing it to what it looked like the last hour.

We put it into the oven, it hardly looked any time to cook, and we took in the lovely smell wafting down the hall. During this time, mt AT also baked the rainbow cake she had made with the children.

After cutting up the loaf, buttering and sprinkling the bread, we all sat down together to enjoy the yummy fairy bread we had made together...


This experience incorporated many science concepts and encouraged the children to hypothesis and be curious about what they were seeing. Being able to see the dough change, bake and then eat the final product fostered such a sense of accomplishment within the group. The timing was perfect, since they celebrated 100 days at kinder and the finished product tasted good! Will definitely be one to try out again, perhaps paired with the story of the Little Red Hen.

Miss Tracy xx

Sunday, 6 July 2014

Placement - Planned Experiences Part 5

Making Bread

The first week of my block placement and was nothing like I expected! The requirements were very different compared to the last. In the first week, I had to prepare 4 observations per focus child (I have four), four planned experiences or environments and a group experience. I also had the parent communication strategy to tackle but you can read all about it in last weeks post, Parent Postcards.

I decided on the theme of baking for my planning for the week. The children in the room love cooking together and food play. Cooking provides an opportunity to explore rich science and mathematical concepts as well as genuine and authentic literacy opportunities. In knowing this, i used the following recipe to make a batch of wholegrain play dough, or bread dough:

Wholemeal Play Dough    
2 tablespoons cooking oil
4 tablespoons cream of tartar
2 cups wholemeal flour
1 cup salt
2 cups water

Mix allthe ingredients together and stir over a medium heat for 3 - 5 minutes or until the mixture congeals. Remove from the heat and turn onto a floured bench and knead until soft. store in an airthight container for up to 6 months. 


I set up an invitation to play during our afternoon quiet time session. I placed the ready made dough, patty pans, cutters, rolling pins and brushes out (dip platters make excellent play trays for play dough, you can pick up cheap ones from $2 shops).

This was the result...


The children made pancakes, pizzas, cupcakes, bread rolls, sandwiches...the list goes on!

The dough turned out to be so soft and malleable. The wholegrain flour gave it such a unique look, it was like actually looking at freshly made dough. The dough withstood the play time and I brought it out over the next few days as well due to its popularity with the group.

I thought I may have a few problems with the sesame seeds, with things like allergies, food restrictions and NQf standards. However, after the children added it to their dough, it mixed in really well and added some texture to the already amazing dough. After play, I stored the dough in an airtight container and it should keep for about 6 months.

I was really happy with this experience and how it went with the children, come back to see how the rest of the week's planning went!

Miss Tracy xx
  

Wednesday, 25 June 2014

Style File - Block Placement Series

Cardigan Target Essentials $10.00
Dress boohoo.com $Unknown
Necklace Louvisa $Unknown
Bracelet Louvisa $Unknown
Shoes Famous Footwear $19.95

Miss Tracy xx

Sunday, 22 June 2014

Parent Postcards

Hi all,

I am currently in the midst of my block placement and slowly getting accustomed to the new expectations. one of those is documented in my placement booklet as follows:

"Implement a parent communication strategy during block placement." 

It says so much and yet ...it doesn't. Many of my units, my assignments and my readings have discussed different ways of involving parents and the many benefits of a early childhood service who does.

Taking what I knew, that parents usually love photos and something specific to their child, I came up with the following template...


Each day, I document 5-6 things that their child did or engaged with and hand-write it onto the left side. On the address lines I write the children's name, the room they are currently in and the date of the observation. My current placement's logo, which I have placed under the address lines, features puzzle pieces on which I place pictures of their child and how they spent their day at kinder.

The children in the kinder room absolutely love writing their names at the moment so I have been asking them if they would like to write their names instead of me doing it. For the uninterested children, I usually just write their name myself.

Just like the learning stories, I try to choose easily identifiable photos of the children and their friends. I also try to include pictures from group time, outside and scheduled sessions, like Hey Dee Ho.

These postcards have proved to be a success! They give the parents a quick slice of what happened that day and something to stick on the fridge. Since they are dated and often approved and requested by the children, they are also something which can be included in their portfolios.

The only problems I have had so far is the timeline. I try to complete one per night with a different child each time but taking and downloading the photos, putting it together, printing, writing and photocopying, it can be really difficult to produce the amount that I would like to send home. I have also been having some issues with whether or not it reaches parents; they seem to be staying in some children's bags and not being read until a few days later.

These aren't massive problems but it means I may have to tweak my approach further down the track. I'm going to stick with this communication method until the end of placement (next week).

Would really appreciate some ideas on what you think all think and whether this is something you would consider implementing!  


Miss Tracy xx