Showing posts with label creating environments. Show all posts

Sunday, 7 September 2014

Placement - Creating Environments Part 5

Hello!

Keeping with the children's interest in the home corner, imaginary play and the letter of the week theme, I began to look for some environment ideas during my full control week. After perusing Pinterest, I came up with the idea of creating a felt board pizza!

After a trip to my local Spotlight, a large chain craft store, where I purchased an A4 multi-coloured felt set, an A3 piece of stiff brown felt, I returned home and looked at what exactly goes into a pizza.

I found this pin, which also has some great ideas for other felt board designs, and decided to include the following toppings:

  • cheese
  • ham
  • pepperoni
  • mushroom
  • capsicum
  • chicken 
  • olives 
It was painstakingly difficult to cut out some of the shapes on the felt and because I traced the shapes on the felt with permanent marker you can see the outline where my cutting was a little off but the end result was pretty good...


I thought the pizza box would add a nice touch so imagine the face of our local pizza hut guy when I asked if I could have a clean empty box alongside my thin and crispy super supreme! I added picture and word labels to the toppings box and besides the large mirror sign and sectioned container of toppings, I also added a small notepad and pen so the children could 'take orders'. During their play, one child suggested we add in a phone so people could call and tell us while another suggested we get a car so we could deliver!

From the pictures and observations, it looks like they had a lot of fun...


This set up encouraged the children to talk about what they wanted to have on their pizza, to consider others as they completed order and encouraged them to use letters and words to symbolise any orders on the note pad. They became very adept at sectioning and sorting the ingredients during pack up time and were quick to tell each other how to take care of their new toy.

It was so cheap and easy to make, minor my small embarrassment at Pizza Hut, and the quality of play that occurred as a result was amazing!

Felt and felt boards is definitely something I want to further play around with and experiment with in the future so stay tuned for any new developments!

Miss Tracy xx

Sunday, 27 July 2014

Placement - Creating Environments Part 4

The Doctors Office

The home corner at placement is a little dated. While the furniture is neutral in color and in good condition, the play items in there are no longer extending the children's interests and so I set about looking at how we can change it. I took this photo as part of one of my observations...


The children who usually prefer to play in the home corner moved all the chairs and lined them up against the mirror to make a bed. One girl, E, tucked L into the new bed, using the tablecloth as a blanket and put her hand against her head to check her temperature. She then brought a cup up to L's lips and let her sip. This type of play could have been inspired by the doctor's office some other educators have set up in the 2-3 year old room, where these children spend family grouping in the morning.

Upon watching this, I asked the children if they could change the home corner, what would they put there instead? It was no surprise when they suggested a doctor's office or hospital. If you follow this Pinterest board of mine, you might have noticed a slew of pins awhile back around medical play as I looked online for inspiration. This was the final result...


Using what I could find in the storeroom, what my AT had from their last hospital play area and moving around some furniture, the area began to take shape. A small table with an old desktop computer, a screensaver printed and tacked on, made the reception area while two chairs made up our waiting room. Including the height chart, eye test, light-box and scales made the area seem more authentic. The bookcase which previously housed utensils and cookware, is now labelled (using this font) and displaying the medical equipment of the Whales Kinder Hospital.


The instruments included some from a store bought doctors kits, and three identical jars filled with cotton balls, cotton buds and Popsicle sticks.

The band aids were made with paper cutouts but you can download print the template below onto cardboard or poster paper for the same result.

The bandages are large pieces of beige/cream ribbon cut to size. I would suggest measuring the ribbon around one of the children to see how much is adequate to tie a knot as our ones were only able to be tied around toys.

The patient forms can be downloaded from here, they are a great literacy tool and the pictures make this template perfect for early childhood. Print out about 20 and attach them a clipboard, don't forget to have a cup of pens or pencils handy like we did near our reception desk.

The stethoscope we used was a real medical one and worked, however if you cant find one or are hesitant to use one in the room, there are plenty available in play doctor kits.

The doctor's bag was made using an old cosmetic case and simply painted it black with a large red cross on top.

The blood pressure cuff was made using a recycled plastic screw-top container. On the top, I attached some cord and a cardboard arm cuff with a red cross glued on and from the left/right side, a cord attached ti a partially blown balloon. This was one of the most played with item as the children had seen it at the doctor's but never had the opportunity to see it in use.

The x-rays that we used in this environment came from a set of animal x-rays purchased through Educational Experience and were stored on a clipboard in this cubby when not on display on the light-box.  

This new area of the room was well received by the children, who continued to surprise me with how they chose to play...


Miss Tracy xx  

Sunday, 20 July 2014

Placement - Creating Environments Part 3

The Handwriting Table 

The children in the kinder room love to write. Some have mastered their names already and write it on every piece of paper they can get their hands on while some of them are still experimenting with what letters they can trace, draw and recognise.

In knowing this, my AT and I have been doing everything we can think of to support this current interest of theirs. When choosing the order to wash hands, put on jackets, get place mats etc. we draw a letter or a name on the board. Some children knew their names and others while others had more fun sorting out the false names from the real ones. During my full control week, I asked the children what their favourite letters were and why for their morning minutes questions and I received some very thoughtful and insightful answers.

When it came time to change one of the activity tables, I had the perfect idea; a writing table!


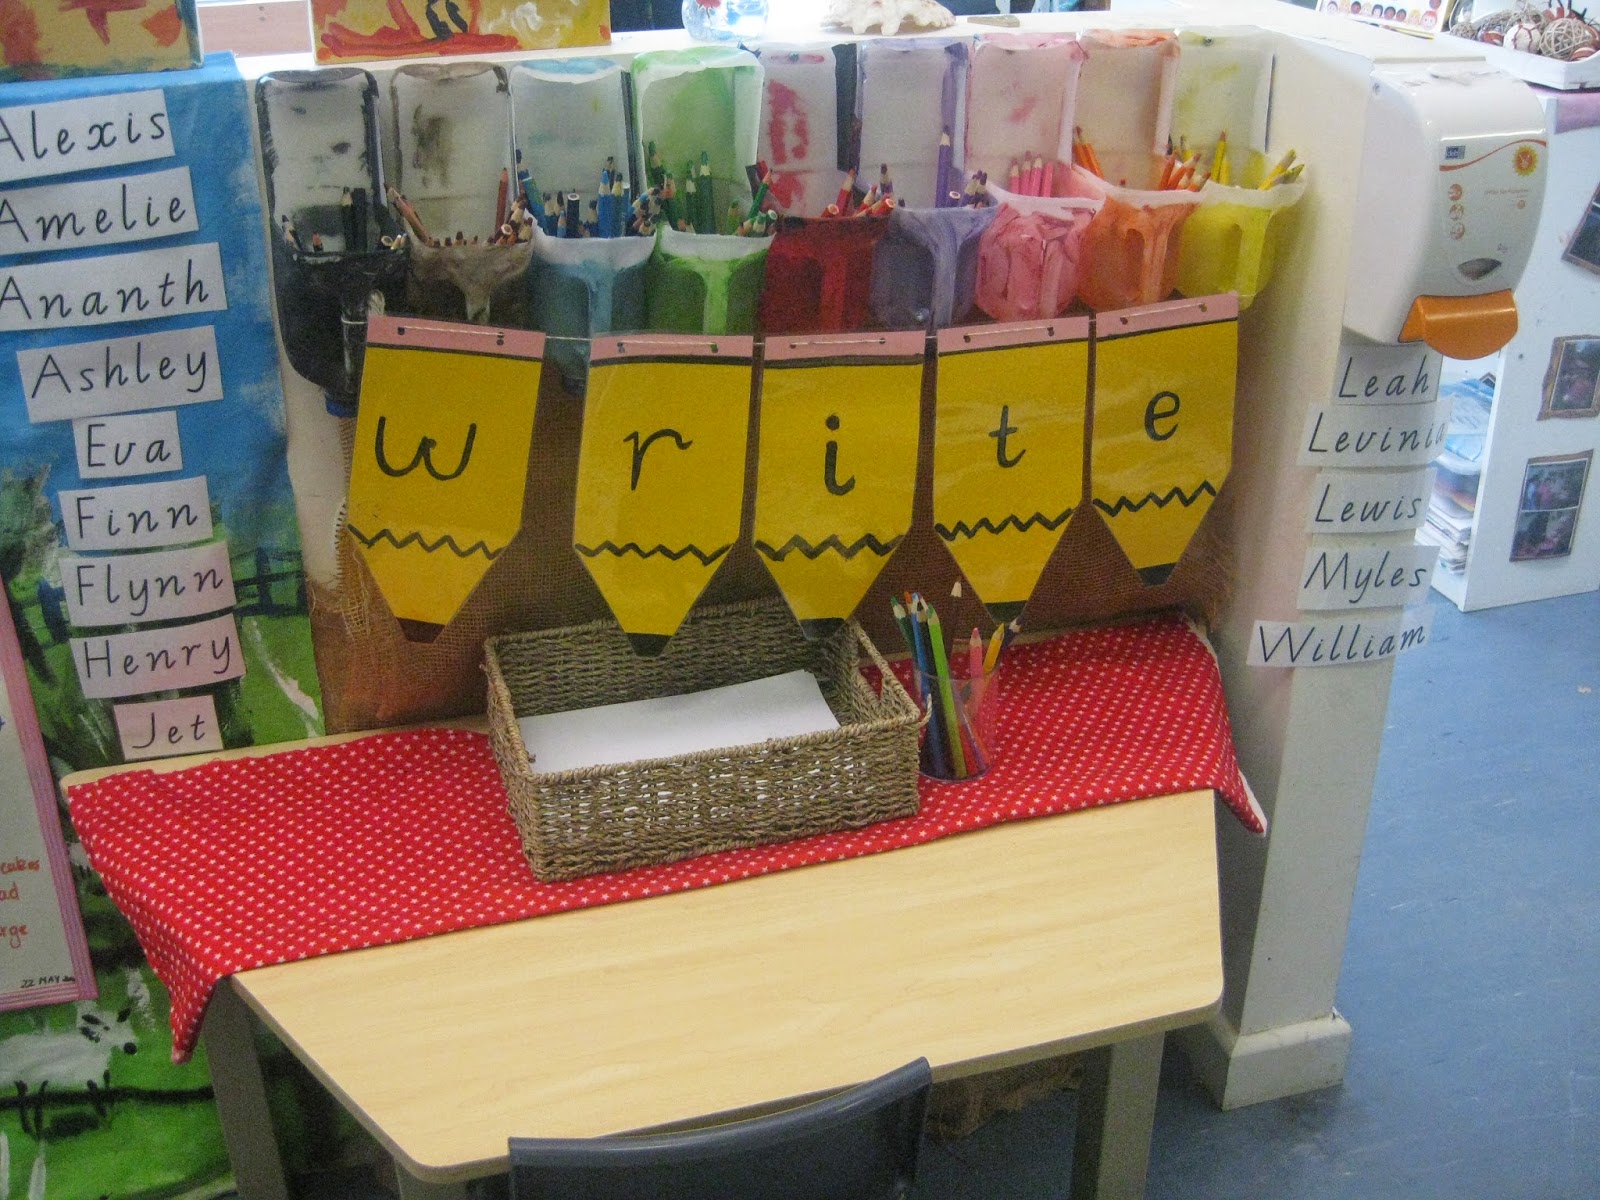
I got the idea for the banner from here but cut out yellow and pink paper instead and painted on the letters. After laminating, I used a hole punch to punch holes (duh) and strung it up using twine. I had to redo some pencils so that they could match so for your convenience and found at the bottom of the post, I have made a template that you can print out and either write, type or paint the letters onto.  The milk carton pencil holders were my AT's idea and sorts out the pencils by colour. After placing the banner up, setting out a tablecloth and some paper in a natural tray, I set to work on the most important part, the names!

The Victorian Modern Cursive Script font is the best tool you could have installed on your computer. It is the font used in Victoria to teach handwriting and to create handouts, posters, practice sheets...you name it, you can type it with this font! I used the holy grail of fonts to type out the children's names and placed them up around the table with Velcro. I decided on Velcro so that they could recognise and pull off their own names should they need help to spell it or what the letters look like,  and then place them back when they were finished.

From the email I received from one parent, "F has asked me for paper and pencils so that he could write his name at home but when I got it for him, he said he needed the table and the banner to write," the children really enjoyed the new edition to the room and what they can do here!

Sunday, 15 June 2014

The Letter Theme

My lovely readers!

It's been so hectic lately but with the semester over,  my exam done and block placement coming up, there will only be new posts from here on in! So let's get on with it...

As noted in some other posts, my AT plans her room and set up based on the letter of the week. We create a letter chart, with common words and the words we know at the beginning of the week and group discussions and planned activities often revolve around said letter. At the end of the week, the poster goes up on wall. 

I have discussed this with some other pre-service teachers and it seems to be a common focus at this level of early childhood however each centre does it differently. For some, they only make the letter poster and talk about the words they know but my AT really goes above and beyond. Let's take a look at the letter L week...

The Letter L Poster


At the beginning of the week, the children create this letter poster. The picture are pulled out of a hat and they all take turns to guess what they are as they all start with L. At the end, the children can list all the words they know with the featured letter. The last step is counting and underlining all the Ls in the words that we write onto the poster.

The Lovely Letter L


At the start of the week, my AT played this song. On the first watch, the children simply watched what was happening.When they asked to play it again, they got up and dance, clapped and stomped their feet. For the rest of the week, they asked to dance to the robot song!

Ladybug Land 


Early in the week, the children each collected a stone from outside and painted it with similar patterns to a ladybug. When dried, my AT took these painted rocks and added them to the tray above. This then sat at the project table, where the children are free to engage with it whenever they please.  

Words with L


Every morning during group time, my AT does her morning minutes. This is her way of encouraging group discussion and the social behaviours expected during these discussion. It is also a way that she intends to prepare the children for what is expected of them when they go to school next year. Above is a copy of the morning minutes sheet, where they were asked, 'What words  do you know that start with the letter L?' Their responses are recorded and the transcript is displayed near the sign in sheets for parents to view at the end of the day. This procedure provides some consistency for the children in the morning and ideas for planning, specifically based in the children's current interests.

Lemon Scented Play Dough
Dough Recipe

2 tablespoons cooking oil
4 tablespoons cream of tartar
2 cups of flour
1 cup salt
2 cups boiling water
bottled lemon juice
lemon extract
yellow food dye

Simply mix all the ingredients together until combined and knead until you get a consistent texture. Add extra essence or juice as necessary.

A member of staff and myself made the play dough with the children, giving them the ingredients to take turns to pour into the bowl. Since we used hot water, the other staff member mixed the dough. when ready, the dough was placed on the table with some wooden pegs and beads. The photos above show what play followed. 

Conclusion - Rather than just focus on the letter in isolation, my AT really looks to provide a wholesome literacy experience which is not didactic or overstated. The linking to the letter L is so well distributed throughout the week and all the activities are so subtlety linked. I love the fact that the learning takes place without the children being denied their unstructured play time, something that will become more restricted as they move into primary school.

This form of planning is definitely something I will be coming back if I decide to become a kindergarten educator. 

Miss Tracy xx

Sunday, 25 May 2014

Placement - Creating Environments Part 2

What's the Scoop?

Following the success of the play dough ice cream, I thought about adding something a little more permanent to the centre's home corner.  Following the find of this pin on Pinterest, I found a way to use the utensils I had bought for the play dough and further extend on the previous sensory experience. After collecting the materials, I set to work. You will need ping pong balls and some appropriately coloured wool or yarn.

They are so simple to make, simply sticky tape a piece of coloured wool to the ping pong balls and wind the string around until you have can't see any of the ping pong ball colour. I used a total of 24 balls but feel free to make more or less depending on numbers in your room. I would suggest wrapping the wool super tight and tying it off really well as some of the children managed to unravel the wool or break the knot I had used when trying to pull the ball out of the cones.


Besides these, you can find everything else in-store. I picked up the ice cream scoops from Kmart for only $2 and the porcelain cones from Typo, $3 for 4. If you can make it to the Southern Cross Station DFO, Melbourne, there are currently sitting on the sale shelf!

I set the environment up before the children could arrive, so they arrived to this scene...  


Plenty of play ensured...


This was one of the best environments I have had the pleasure of setting up. It was so easy and simple and yet the children found such joy and happiness when they were engaging with it. The staff were equally impressed, at the set up and the materials used to create this set up.

This is definitely one I will be saving to use again, in my own classroom!

Miss Tracy xx

Sunday, 18 May 2014

Placement - Creating Environments Part 1

Creek Explorers

If there is one thing I have noticed about the children in this kinder room, it is their love of exploring and how much they love playing with water. Last week, after days of rain, a large puddle formed over part of our playground. While did this pose a safety threat due to its size and depth, the educators cornered it off and allowed play provided that the children didn't put their hands or feet in the water.

One of my focus children, W, used a garden rake to play with this new attraction. He skimmed it across the water and watched the patterns it made. When I asked him what he was doing, he told me his was fishing, and that all the fish went into the bucket, the large bin we use to store the sand and water toys in.

I pondered over this observation throughout the week and used what I had seen as the basis for my next implementation; a creek environment where the children could explore a small ecosystem. 


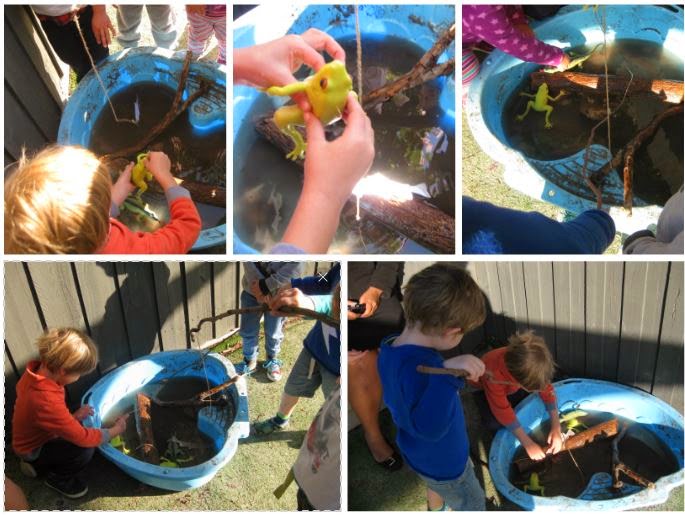
After filling the bottom of the container with various sized pebbles and filling in one-third full of water, i began to arrange the elements of this environment. I purchased the frogs from my local dollar shop, along with the lizard. I foraged the park across from my house, and the kinder store room, for the large logs and twigs. After attaching some twine and a hook shaped paperclip to the long twigs, I had two fishing rods.

Accompanying the creek were some small fish! I printed and laminated images of trout and attached them to paperclips, so that the children could link the hook and the paperclip to catch the fish. Below is a link to the document that you can laminate to create your own fishing experience! In the end, I added a total of 8 fish.

The children were so excited to watch me put this together! By the time I had finished, they had already picked up the frogs, experimenting with how stretchy they are and who was too scared to even attempt touching them. The fishing rods worked great, however I wished I had made more so that more children could fish simultaneously with out too much conflict. Had I the money, I would have acquired a container which looked more natural, but I made do with what the centre already had.  

Some images of the little explorers...


UPDATE 28/05/2014 - The water, if not changed regularly, begins to smell and can be dangerous if accidentally ingested. If you plan on having this environment active for longer than 7 days, ensure you change the water as soon as you notice any changes.

Miss Tracy xx

Sunday, 4 May 2014

Placement - Planned Experiences Part 2

Garden Sensory Box

Every week in our kinder room, we have a letter focus and last week's was the letter 'G'. We listed all the words we knew which started G and my AT set up a grass growing station where the children could see mustard and fennel seeds grow. We have also been changing the vegetable patch outside and planting some flowers in the barrels.

To support these changes, I thought a garden sensory bin would complement what the learning environment and the current interests of the room. After discussing this, I began working on putting the environment together. 

I got the inspiration for this environment from this post and began collecting the materials: 
  • Two 6 egg cartons 
  • Green pipe cleaners
  • Paints
  • Envelopes
  • Coloured paper
  • Popsicle sticks
  • Got glue gun and sticks
  • Pebbles 
  • Laminator and sheets 

First step was cutting up the carton, by the end of it you should have 12 little 'cups' and make sure you save the lid for a seedling box. I cut up 2 pipe cleaners to make 12 little pieces, folded in half to make the 'V'.  You can paint the cups whatever colours you like, I chose these because they matched the colours of the vegetables I picked. 


Once the paint has dried, cut a little slit into the tops of the cups so you can poke the pipe cleaners through. To make them look a little cuter, I curled the tops on a pencil. And there you have it, little vegetable seedlings!


Next up is the planters. Introducing the first LMST freebie, which can be downloaded below, just print out the page, laminate it if not printing on card stock, and glue them to the popsicle sticks.


To make the seed packets, you can download the labels below and print onto coloured paper. Then glue to the envelopes. I filled mine with pebbles and glued it shut but depending on the age group of the children in your care, you can use bigger/smaller articles and chose whether to glue it shut or not.

Add a couple of child sized gloves, a watering can, some small gardening tools and there you have it - garden sensory box! Don't forget to grab some small pebbles or coloured sand for your 'dirt'.

The final product looked great in the room and the children loved it! It was super easy to put together and was an opportunity to recycle some of our household waste. It was a perfect opportunity to link to my AT's learning focus and I am so happy with how it all turned out.

As for the children; loved it! Bringing the dirt and nature into the classroom really opened up the chance for them to get excited  about planting our veggie garden and adding some greenery to our playground. The biggest hit has been the gloves but since there is two chairs at the table and to gloves, some opportunities here to practice their sharing skills. The amount of collaborative work that happens at this station is phenomenal!


As promised, you can download the templates below, the very first LMST free download with only more to come!

Sunday, 12 January 2014

Placement - Creating Environments Part 2

Hey all,

So during my second week of placement, I had to make an environmental change with the outdoor environment. The centre had a beautiful blue water trough but following a child getting comfortable inside the trough, a large crack appeared. This meant that for the last 12 weeks, it had only been filled with a small layer of sand and some sifts.

I saw this area as an opportunity to make a positive and supportive change and got to work o  how a could switch it up. During one of my tea breaks, I came across a book in the staff room a out creating play environments and after a quick flick through, I found a recipe for making coloured rice.

Coloured Rice

White rice (amount depending on the activity/environment you are planning)
Food coloring
Water
Large flat tray

Lay the rice flat on your tray. Mix the water, just enough to wet the rice, and your food colouring. The darker the colour you want the rice to be, the more food colouring you should be adding. Mix the rice and the water, moving it around so that all the grains are coated. Lay in a warm dry area to dry. If using separate colours, they can be mixed at this point in the process Once completely dry, the rice can be stored indefinitely.  


I chose the blue so that I could create and under the sea theme following an underwater puppet show that the children experienced. After the rice was dried and mixed, I brought it to the centre and placed it into the trough. I added some small blue cups for pouring, some shells to further the experience and some bath toys.

The end result looked spectacular and the children could not be pulled away!


The rice provided a new use for the trough and really lit up this area of the garden. To actually look at the rice and see it run through their fingers was a different experience for the children and the smell of the Basmati rice added to this.

I would definitely replicate this in the future and already have some ideas on how to do so. However, while the children enjoyed it, the cleaning up is not as easy as sand. Older children would understand that the rice needs to stay in the trough, a concept that was lost on the 0-2 age group. But this did not stop them from enjoying themselves.

The educators really loved this and since the weather in Melbourne is so often hot and dry, preparing this material is terribly easy for the staff. I would definitely recommend trying this in your educational environment!

Miss Tracy xx

Sunday, 29 December 2013

Placement - Creating Environments Part 1

Me again!

As you have already seen some of my planned experiences, I thought I would show you the environment changes. The requirements were to change or create a new environment during my second week, one indoors and one outdoors. This post focuses on my indoor environment.

The children in the room spend a lot of time playing in the home corner and I noticed that C was starting to engage in more and more imaginary play so I thought about replicating a familiar environment that the children would love. After some online idea searching, I laid eyes on this, featured on the Estefi Machado blog, and could not get it out of my head. After more looking, I decided that this idea was the one and started to work on building my own...


The hardest part was finding a box large enough. I have a good friend who works at the Good Guys who was kind enough to direct me to their packaging warehouse, where I got my  hands on an actual washoing machine box. The box is designed to just cover the washer so there was no bottom. I made the box shorter and used the left over cardboard to form a floor. I then taped everything up so it resembled a cube.

The next step was cutting out the hole, and  moving very slowly, I managed to use a Stanley knife to cut the round shape. Leaving one quarter of the circle uncut, I was able to create a fold, which means that the door can be open and shut and objects placed inside. Then a circle with a smaller circumference was cut to create the window. I recently bought some new bed sheets and used the plastic pouches they came in to create the glass of the window. You can use plastic sheeting or a clear table cloth to create the same effect.

The last step was adding the details and using the picture from Estefi Machado and a new Sharpie, I copied the marking onto the cardboard. I was so impressed with the final product and looked forward to adding it to the centre environment.

A cardboard box in the shape of a washing didn't seem enough for the children so I purchased some coloured dolly pegs from the $2 shop, found and recycled an iron board stand and borrowed some dolly clothes, a peg bucket and a small basket from the centre. And then I created a laundry room!


The children were so excited to play with the box, hiding in it, emptying the pegs and clothes and putting them back, opening and shutting the door; they could not get enough of it! The staff were also impressed with the change and were taken aback by the washing machine. As of when I left, the box was still intact but the staff had taken the top flaps off so they could see inside but other than that, the laundry room was in still in action.

If I was to replicate this, there are some changes to consider:

  • creating a bigger door
  • using a larger clothesline with better 'lines'
  • adding scoops, wash powder boxes, Napisan cylinders etc.
  • changing the style to a top loader to prevent crawling in
Overall, I am so happy with how everything turned out and cannot wait to create more environment which initiate and sustain play based learning!

Miss Tracy xx

Sunday, 8 December 2013

Highschool Reunion!

Hey there!

So from what the movies have told me, when people hear 'high-school reunion', they usually scream and run for the hills! Being only a year out from the institution, I was looking forward to my first year reunion so when I received an invitation to help organise the event, I jumped at the opportunity.

While at school, I didn't have much contact with our Alumnae department; there never seems to be the perfect time to meet the people you won't see until after high-school! When I got the email from the wonderful S, a member of our Alumnae department, I didn't really know what I was getting myself into.

Plenty emails back and forth later, we had settled on a date and sent out a mass text message save the date to my year level. Educated in the age of technology, we used a Facebook poll to decide which date could have the most people attend and planned accordingly.

Next step was the invitation; to be simple, aesthetically pleasing and audience appropriate. I originally designed three proofs and had a personal favourite, featuring the official Pantone colours of my school's logo. This mock-up ended up being everyone's favourite and was the invitation sent out. I removed the details, but here's a good look at the final product...
Next was the decorations. With a budget of $50, I managed to score balloons, streamers, napkins, two table runners, balloon clips and pipes and hot glue sticks. The table runners were glued together and I fashioned hot balloon centre-pieces from various recyclable materials. The Alumnae department has a perpetual banner, featured below, and a banner is printed for the associated year level. The food was catered, from a nearby cafe and including hot food, sandwiches, fruit platter, dessert platters, drinks and a gluten free and vegetarian alternative, it came to around $10.50 a head. Have a look at the end result... 


The night went really well! Something around 35 people turned up, not including staff from the school. The girls all loved it and could not stop talking to each other. Some girls who left before year 12 were even in attendance. We all laughed over slideshows and photo videos and highly out of the ordinary for our year level...there was no drama!

This experience has been one in a million. It reminded me how much I enjoy event planning and budgeting and how much the little details matter.I even had a chance to let my creative juices flow. I managed to do all this during the peak of the semester so my time planning skills were out of this world!

Working collaboratively with S has been such a learning opportunity and I cannot thank here enough for allowing me this opportunity; I can't wait for the next big event I am part of. The following is a copy of the reunion report written (by me)  for the Class of 2012's first year reunion to be featured in the school newsletter and /or yearbook...


Looking ahead, I can't wait for the next reunion and hopefully, I will be able to assist again!

Have you helped organise an old school event? 
What's your experience with reunions?
What did you think of our handiwork?

Fill me in!

Miss Tracy xx

Monday, 2 December 2013

SNEAK PEEK: Planned Experiences and Creating Environments

Just a little taste of what's to come, prepare for some great ideas, recipes and tutorials!


Miss Tracy xx