Showing posts with label freebie. Show all posts

Sunday, 27 July 2014

Placement - Creating Environments Part 4

The Doctors Office

The home corner at placement is a little dated. While the furniture is neutral in color and in good condition, the play items in there are no longer extending the children's interests and so I set about looking at how we can change it. I took this photo as part of one of my observations...


The children who usually prefer to play in the home corner moved all the chairs and lined them up against the mirror to make a bed. One girl, E, tucked L into the new bed, using the tablecloth as a blanket and put her hand against her head to check her temperature. She then brought a cup up to L's lips and let her sip. This type of play could have been inspired by the doctor's office some other educators have set up in the 2-3 year old room, where these children spend family grouping in the morning.

Upon watching this, I asked the children if they could change the home corner, what would they put there instead? It was no surprise when they suggested a doctor's office or hospital. If you follow this Pinterest board of mine, you might have noticed a slew of pins awhile back around medical play as I looked online for inspiration. This was the final result...


Using what I could find in the storeroom, what my AT had from their last hospital play area and moving around some furniture, the area began to take shape. A small table with an old desktop computer, a screensaver printed and tacked on, made the reception area while two chairs made up our waiting room. Including the height chart, eye test, light-box and scales made the area seem more authentic. The bookcase which previously housed utensils and cookware, is now labelled (using this font) and displaying the medical equipment of the Whales Kinder Hospital.


The instruments included some from a store bought doctors kits, and three identical jars filled with cotton balls, cotton buds and Popsicle sticks.

The band aids were made with paper cutouts but you can download print the template below onto cardboard or poster paper for the same result.

The bandages are large pieces of beige/cream ribbon cut to size. I would suggest measuring the ribbon around one of the children to see how much is adequate to tie a knot as our ones were only able to be tied around toys.

The patient forms can be downloaded from here, they are a great literacy tool and the pictures make this template perfect for early childhood. Print out about 20 and attach them a clipboard, don't forget to have a cup of pens or pencils handy like we did near our reception desk.

The stethoscope we used was a real medical one and worked, however if you cant find one or are hesitant to use one in the room, there are plenty available in play doctor kits.

The doctor's bag was made using an old cosmetic case and simply painted it black with a large red cross on top.

The blood pressure cuff was made using a recycled plastic screw-top container. On the top, I attached some cord and a cardboard arm cuff with a red cross glued on and from the left/right side, a cord attached ti a partially blown balloon. This was one of the most played with item as the children had seen it at the doctor's but never had the opportunity to see it in use.

The x-rays that we used in this environment came from a set of animal x-rays purchased through Educational Experience and were stored on a clipboard in this cubby when not on display on the light-box.  

This new area of the room was well received by the children, who continued to surprise me with how they chose to play...


Miss Tracy xx  

Sunday, 20 July 2014

Placement - Creating Environments Part 3

The Handwriting Table 

The children in the kinder room love to write. Some have mastered their names already and write it on every piece of paper they can get their hands on while some of them are still experimenting with what letters they can trace, draw and recognise.

In knowing this, my AT and I have been doing everything we can think of to support this current interest of theirs. When choosing the order to wash hands, put on jackets, get place mats etc. we draw a letter or a name on the board. Some children knew their names and others while others had more fun sorting out the false names from the real ones. During my full control week, I asked the children what their favourite letters were and why for their morning minutes questions and I received some very thoughtful and insightful answers.

When it came time to change one of the activity tables, I had the perfect idea; a writing table!


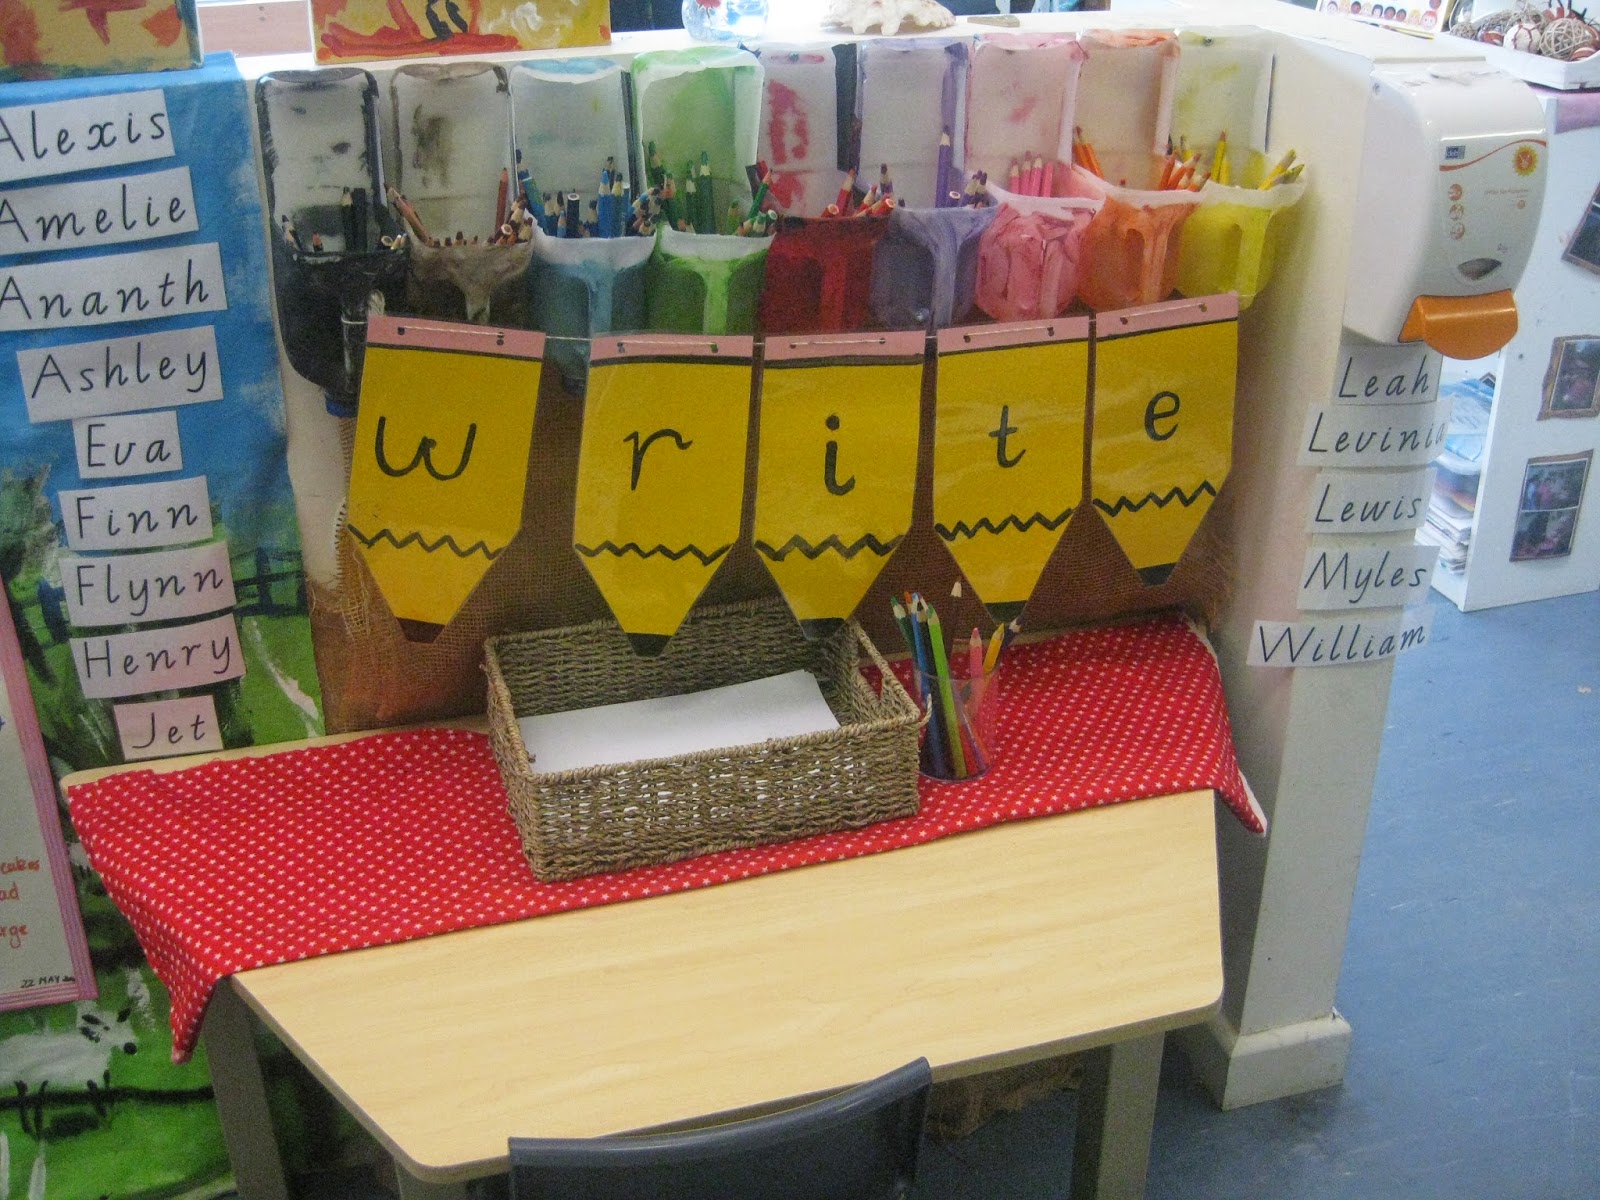
I got the idea for the banner from here but cut out yellow and pink paper instead and painted on the letters. After laminating, I used a hole punch to punch holes (duh) and strung it up using twine. I had to redo some pencils so that they could match so for your convenience and found at the bottom of the post, I have made a template that you can print out and either write, type or paint the letters onto.  The milk carton pencil holders were my AT's idea and sorts out the pencils by colour. After placing the banner up, setting out a tablecloth and some paper in a natural tray, I set to work on the most important part, the names!

The Victorian Modern Cursive Script font is the best tool you could have installed on your computer. It is the font used in Victoria to teach handwriting and to create handouts, posters, practice sheets...you name it, you can type it with this font! I used the holy grail of fonts to type out the children's names and placed them up around the table with Velcro. I decided on Velcro so that they could recognise and pull off their own names should they need help to spell it or what the letters look like,  and then place them back when they were finished.

From the email I received from one parent, "F has asked me for paper and pencils so that he could write his name at home but when I got it for him, he said he needed the table and the banner to write," the children really enjoyed the new edition to the room and what they can do here!

Sunday, 22 June 2014

Parent Postcards

Hi all,

I am currently in the midst of my block placement and slowly getting accustomed to the new expectations. one of those is documented in my placement booklet as follows:

"Implement a parent communication strategy during block placement." 

It says so much and yet ...it doesn't. Many of my units, my assignments and my readings have discussed different ways of involving parents and the many benefits of a early childhood service who does.

Taking what I knew, that parents usually love photos and something specific to their child, I came up with the following template...


Each day, I document 5-6 things that their child did or engaged with and hand-write it onto the left side. On the address lines I write the children's name, the room they are currently in and the date of the observation. My current placement's logo, which I have placed under the address lines, features puzzle pieces on which I place pictures of their child and how they spent their day at kinder.

The children in the kinder room absolutely love writing their names at the moment so I have been asking them if they would like to write their names instead of me doing it. For the uninterested children, I usually just write their name myself.

Just like the learning stories, I try to choose easily identifiable photos of the children and their friends. I also try to include pictures from group time, outside and scheduled sessions, like Hey Dee Ho.

These postcards have proved to be a success! They give the parents a quick slice of what happened that day and something to stick on the fridge. Since they are dated and often approved and requested by the children, they are also something which can be included in their portfolios.

The only problems I have had so far is the timeline. I try to complete one per night with a different child each time but taking and downloading the photos, putting it together, printing, writing and photocopying, it can be really difficult to produce the amount that I would like to send home. I have also been having some issues with whether or not it reaches parents; they seem to be staying in some children's bags and not being read until a few days later.

These aren't massive problems but it means I may have to tweak my approach further down the track. I'm going to stick with this communication method until the end of placement (next week).

Would really appreciate some ideas on what you think all think and whether this is something you would consider implementing!  


Miss Tracy xx

Sunday, 18 May 2014

Placement - Creating Environments Part 1

Creek Explorers

If there is one thing I have noticed about the children in this kinder room, it is their love of exploring and how much they love playing with water. Last week, after days of rain, a large puddle formed over part of our playground. While did this pose a safety threat due to its size and depth, the educators cornered it off and allowed play provided that the children didn't put their hands or feet in the water.

One of my focus children, W, used a garden rake to play with this new attraction. He skimmed it across the water and watched the patterns it made. When I asked him what he was doing, he told me his was fishing, and that all the fish went into the bucket, the large bin we use to store the sand and water toys in.

I pondered over this observation throughout the week and used what I had seen as the basis for my next implementation; a creek environment where the children could explore a small ecosystem. 


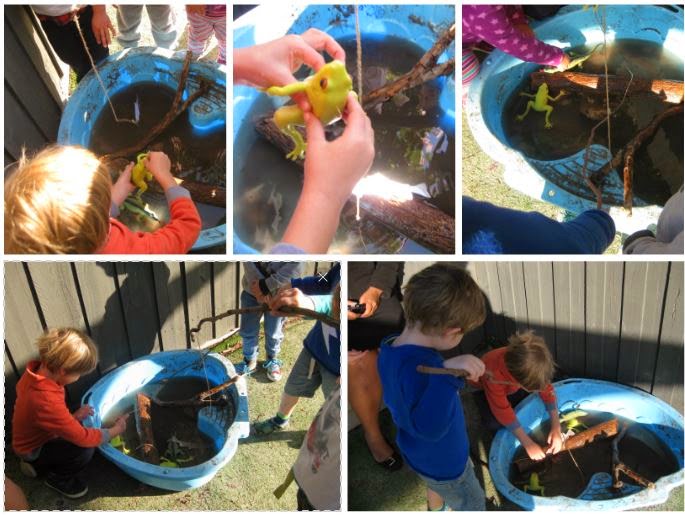
After filling the bottom of the container with various sized pebbles and filling in one-third full of water, i began to arrange the elements of this environment. I purchased the frogs from my local dollar shop, along with the lizard. I foraged the park across from my house, and the kinder store room, for the large logs and twigs. After attaching some twine and a hook shaped paperclip to the long twigs, I had two fishing rods.

Accompanying the creek were some small fish! I printed and laminated images of trout and attached them to paperclips, so that the children could link the hook and the paperclip to catch the fish. Below is a link to the document that you can laminate to create your own fishing experience! In the end, I added a total of 8 fish.

The children were so excited to watch me put this together! By the time I had finished, they had already picked up the frogs, experimenting with how stretchy they are and who was too scared to even attempt touching them. The fishing rods worked great, however I wished I had made more so that more children could fish simultaneously with out too much conflict. Had I the money, I would have acquired a container which looked more natural, but I made do with what the centre already had.  

Some images of the little explorers...


UPDATE 28/05/2014 - The water, if not changed regularly, begins to smell and can be dangerous if accidentally ingested. If you plan on having this environment active for longer than 7 days, ensure you change the water as soon as you notice any changes.

Miss Tracy xx

Sunday, 4 May 2014

Placement - Planned Experiences Part 2

Garden Sensory Box

Every week in our kinder room, we have a letter focus and last week's was the letter 'G'. We listed all the words we knew which started G and my AT set up a grass growing station where the children could see mustard and fennel seeds grow. We have also been changing the vegetable patch outside and planting some flowers in the barrels.

To support these changes, I thought a garden sensory bin would complement what the learning environment and the current interests of the room. After discussing this, I began working on putting the environment together. 

I got the inspiration for this environment from this post and began collecting the materials: 
  • Two 6 egg cartons 
  • Green pipe cleaners
  • Paints
  • Envelopes
  • Coloured paper
  • Popsicle sticks
  • Got glue gun and sticks
  • Pebbles 
  • Laminator and sheets 

First step was cutting up the carton, by the end of it you should have 12 little 'cups' and make sure you save the lid for a seedling box. I cut up 2 pipe cleaners to make 12 little pieces, folded in half to make the 'V'.  You can paint the cups whatever colours you like, I chose these because they matched the colours of the vegetables I picked. 


Once the paint has dried, cut a little slit into the tops of the cups so you can poke the pipe cleaners through. To make them look a little cuter, I curled the tops on a pencil. And there you have it, little vegetable seedlings!


Next up is the planters. Introducing the first LMST freebie, which can be downloaded below, just print out the page, laminate it if not printing on card stock, and glue them to the popsicle sticks.


To make the seed packets, you can download the labels below and print onto coloured paper. Then glue to the envelopes. I filled mine with pebbles and glued it shut but depending on the age group of the children in your care, you can use bigger/smaller articles and chose whether to glue it shut or not.

Add a couple of child sized gloves, a watering can, some small gardening tools and there you have it - garden sensory box! Don't forget to grab some small pebbles or coloured sand for your 'dirt'.

The final product looked great in the room and the children loved it! It was super easy to put together and was an opportunity to recycle some of our household waste. It was a perfect opportunity to link to my AT's learning focus and I am so happy with how it all turned out.

As for the children; loved it! Bringing the dirt and nature into the classroom really opened up the chance for them to get excited  about planting our veggie garden and adding some greenery to our playground. The biggest hit has been the gloves but since there is two chairs at the table and to gloves, some opportunities here to practice their sharing skills. The amount of collaborative work that happens at this station is phenomenal!


As promised, you can download the templates below, the very first LMST free download with only more to come!

Sunday, 30 March 2014

In Review - dotEPUB

Hello readers,

For those of you you have an iPad, this post is for you. For those of you who have an iPad without 3G, you will enjoy this post even more so than those who do.

Introducing...

The idea is simple; this website helps you convert any compatible webpage into ePub format, so it can be be viewed on an iPad using the iBooks application. To actually use the function is even simpler.

If you have an iPad, you save this site as a bookmark. If using a desktop, install the extension onto your browser. When you find a webpage, simply click the button/bookmark and the page will begin to convert into the ePub format. It is that easy!

There is also an immersive mode; for pages which contain unnecessary links and images, you have the option not to include them on your document so it only contains text.

The following is an doteEPUB converstion of THIS PAGE, detailing my university course:


This little application is helpful when you need to save pages ahead of time or as documents to continually view. The ease of use means you don't have to worry about printing unnecessary pages and worrying about whether a webpage will be later available or not.

Since finding this gem, I haven't stopped using it, and hope that you too find joy in how easy it is to convert webpages to ePub format.

For those using a kindle, there is the option for MOBI file conversion .

Miss Tracy xx


Sunday, 23 March 2014

My Educational App Collection

Good morning all,

I have been posting a few app reviews lately and thought it was about time I showed you my app collection. It's taking a while to come up with this many educational apps and I have had some great sources; the Ipadopedia, a children's literature unit I took in first semester and a music education unit I just completed.
But lately I have found a new source, the Education section of the iTunes store. This section of the store caters for varying levels of education, from early childhood straight up to self education for adults. It is meticulously organised, much like my iPad, and has great sections:
  • Reading
  • Maths
  • Physics 
  • Chemistry
  • Music
  • Writing
  • Life Science
  • Geography
  • Astronomy and Earth Science

And so we begin the journey through my iPad! I have provided a picture of each folder and the apps they contain and what section I find them useful to store under.
LMST BLOG


COACHING


DEMONSTRATIONS


DIAGRAMS

DOCUMENTING


LITERACY


MANAGEMENT


MATHS


MEASUREMENT


MUSIC


SCIENCE & GEOGRAPHY


SOUND MANAGEMENT 

And as usual, all apps I have posted today are available on the App Store however please note some are free and some are paid so please check before you press the little green button!

Miss Tracy xx


Sunday, 16 March 2014

In Review - The Teacher's IpadoPedia

Hey readers,

Recently I decided to peruse the (free) shelves on the iTunes bookstore and was astounded by the number of free books available in the education section. I came across textbooks, guides and many other wonderful things and promptly downloaded all that I could see. The first book I decided to read was 'The Teacher's IpadoPedia, An A-Z of using iPads in the classroom' by Philip Johnston.

Philip Johnston


After my first placement and some of the material we have been covering in class, I have come to realise what an impact technology can have in the classroom, both good and bad, and how this comes into play when I eventually am in the classroom. For these reasons, I decided to go with this book first and was pleasantly surprised with what I had found.

This book blew my mind! Not only was it incredibly well written and set out, Johnston commented on a large range of topics including:
  • attendance 
  • managing homework
  • archiving
  • coaching
  • photocopying
  • quizzing
  • creative writing
  • taking notes
The book is divided into categories, with app listed which can either perform a task or help aid the process of the mentioned categories. Not only is there a wide range of apps, free and paid, to cover the categories but the book is cross references when apps have multiple functions. 

The actual layout of the book is clean with small chunks of information and plenty of pictures to accompany. The great thing about this being an eBook is that often the text is interactive! Beside the text, you will often find videos which demonstrate an app and how it works and text is often hyper-linked to show you exactly what app you should download and where to find them.


I have already downloaded some of the apps and can see their potential for use of them in the classroom. Other I have been able to integrate into my university life! Overall I enjoyed reading this book, it was not text heavy, it flowed well, you could jump chapters without feeling lost and the interactive nature made finding what Johnston what talking about incredibly easy.   

Philip Johnston has also step up a great website for the book which includes sample pages, links to download the book as well as a contact page if you would like to speak with the author. The website can be found here.


As Johnston said in the foreword, reading this book does not mean you have to apply everything that you read about but rather take what you like and make it work for your classroom. There are some great apps listed and the great thing is the discovery, while Johnston may list the app for one use, you could find a totally new use, either for the classroom or for your personal life!

For those of you who are still unsure, you have nothing to lose as this book is 100% free to download from the iBookstore!


Stay tuned as I discover more education eBooks from the iTunes bookstore!

Miss Tracy xx