Hello!
With full control in full swing, it was expected during my placement that I plan for one week and implement for two days. I had seen my AT's weekly plan up every week I was at placement so I knew the expected format and sat down with her to discuss what the expectations for the week were.
As you may have noticed, many of the environments and experiences I have been writing about on here have focused on the letter P, this being because during my full control week, the focus letter was P. The following was my plan for the week...
I accounted for weekly activities, such as sport and yoga, some activities that my AT had in mind and some general planning included every week. The focus on Literacy and Numeracy was part of my AT's original format. It's not how I would probably set out my plan but it was interested to use these as a focus.
The hardest part of constructing this was having all these great ideas for the children and the room but having to find somewhere to link it and aligning these with the children's interests. The research that went into coming up with this plan was so fun and one of my favourite parts of the job. Using other blogs, Pinterest, Tumblr I found heaps of ideas incorporating the letter P and the children's current interests and favourite experiences and then planned these around the routine and timetable of the room.
As the week progressed, I wrote little notes onto the plan, which is displayed above the children's cubbies for parents to view. I wrote the date they were implemented, whether or not it was sucessful and whether I would be doing an observation or learning story for the experience. These annotations helped the parents see what was happening throughout the week and my AT see how I was progressing and following up on my planning and programming.
As a result of this planning, my full control was successful and I learned heaps of new things and really began to see myself as an early childhood educator rather than just a visitor or student.
Keep your eyes peeled for more about my time in full control!
Miss Tracy xx
Showing posts with label full control. Show all posts
Sunday, 28 September 2014
Sunday, 21 September 2014
Placement - Planned Experiences Part 8
Hi there!
Still trying to capitilise on all the rich experiences I had on placement, today's post is about how to make and use puffy paint! Again with the letter P theme, my AT's idea was to create the paint and set them up on our art and craft table.
The recipe for creating the paint is super simple, with things you can readily find in your kitchen or supermarket.
Still trying to capitilise on all the rich experiences I had on placement, today's post is about how to make and use puffy paint! Again with the letter P theme, my AT's idea was to create the paint and set them up on our art and craft table.
The recipe for creating the paint is super simple, with things you can readily find in your kitchen or supermarket.
Puffy Paint
1 cup flour
1 cup salt
3 cups water
Paint
Mix all the ingredients together until they form a batter-like consistency. Depending on how many colours of paint you would like to make, separate into your chosen containers that the children will use to paint with (see note). Add a small squirt of paint to each mixture and mix until you see the desired colour appear and then you're ready to go!
I used zip lock bags with a smal hole cut out from a corner for the children to paint with. While there was no problems using these, they were very flimsy and some children had difficulty using the bags to 'pipe' the paint. I would suggest using old sauce bottle or buying a new set as they are easier to hold and could have plenty of other uses in the classroom, not just for this activity.
The other thing I noticed when I tested it at home was that normal paper would get soggy under the batter and would rip, tear or start to break down. For this reason, at the kinder, we used A3 canvas paper that had been halved for the children to paint with. Stiff cardboard or poster paper can substitute if you don't have or can't find this.
Once I had set up the activity after afternoon tea, the children were very eager to see what was happening. My AT and I had to show a few children how to hold and press the bag, but they were very eager to get painting...
Now the magic happens! After the children had completed their painting, we set them on the drying rack. During their outside play time, I went into the staff room and put the painting in the microwave for 30-60 seconds depending on how much paint was on the paper. The flour and salt cook leaving the paint raised and very bumpy.
The children loved the change and how different it felt. Some even compared the picture to the paints by feeling one and then the other. This was a really fun and engaging activity and could be used with younger or older children. Give it a try in your classroom and let me know how it goes!
Miss Tracy xx
Sunday, 7 September 2014
Placement - Creating Environments Part 5
Hello!
Keeping with the children's interest in the home corner, imaginary play and the letter of the week theme, I began to look for some environment ideas during my full control week. After perusing Pinterest, I came up with the idea of creating a felt board pizza!
After a trip to my local Spotlight, a large chain craft store, where I purchased an A4 multi-coloured felt set, an A3 piece of stiff brown felt, I returned home and looked at what exactly goes into a pizza.
I found this pin, which also has some great ideas for other felt board designs, and decided to include the following toppings:
Keeping with the children's interest in the home corner, imaginary play and the letter of the week theme, I began to look for some environment ideas during my full control week. After perusing Pinterest, I came up with the idea of creating a felt board pizza!
After a trip to my local Spotlight, a large chain craft store, where I purchased an A4 multi-coloured felt set, an A3 piece of stiff brown felt, I returned home and looked at what exactly goes into a pizza.
I found this pin, which also has some great ideas for other felt board designs, and decided to include the following toppings:
- cheese
- ham
- pepperoni
- mushroom
- capsicum
- chicken
- olives
It was painstakingly difficult to cut out some of the shapes on the felt and because I traced the shapes on the felt with permanent marker you can see the outline where my cutting was a little off but the end result was pretty good...
I thought the pizza box would add a nice touch so imagine the face of our local pizza hut guy when I asked if I could have a clean empty box alongside my thin and crispy super supreme! I added picture and word labels to the toppings box and besides the large mirror sign and sectioned container of toppings, I also added a small notepad and pen so the children could 'take orders'. During their play, one child suggested we add in a phone so people could call and tell us while another suggested we get a car so we could deliver!
From the pictures and observations, it looks like they had a lot of fun...
This set up encouraged the children to talk about what they wanted to have on their pizza, to consider others as they completed order and encouraged them to use letters and words to symbolise any orders on the note pad. They became very adept at sectioning and sorting the ingredients during pack up time and were quick to tell each other how to take care of their new toy.
It was so cheap and easy to make, minor my small embarrassment at Pizza Hut, and the quality of play that occurred as a result was amazing!
Felt and felt boards is definitely something I want to further play around with and experiment with in the future so stay tuned for any new developments!
Miss Tracy xx
Posted by
Miss Tracy
at
9:00 am
No comments:
Labels
3-5,
arts and craft,
bargain,
block placement,
creating environments,
did it myself,
full control,
home corner,
imaginary play,
make and create,
pinterest,
placement,
second year
Sunday, 31 August 2014
Group Observations and Learning Stories
Hola!
I have shared how I write my individual observations for portfolios and planning on here before but am yet to share group learning stories. I only started writing them this year but they are an incredible tool!
Most kindergarten classrooms ave a space where we educators post what we are doing in the classrooms and pieces of children's work to share with parents and caregiver. this was no different in my placement centre...
Featured on this board are two group learning stories printed on A3 paper and photos taken from the group experiences. Writing a group learning story, I feel, is quite different from writing them for an individual child.
Rather than focusing on the specific, I tend to focus on what all the children are doing, what they are learning, what they all have in common. I also try to include some individual responses, sometime included in the story or by writing/typing them out and sticking them up near posted story. This one was an example from the creek experience I set up earlier in the year...
As always, include lots and lots of photos! I cut mine off the bottom, but taking and selecting group phots is one of the most fun parts of writing these! These group experiences are wonderful to have but even better to document and share with families. Slightly adjusting how we write these isn't too difficult but the end result is completely worth the extra time and effort.
Some key things to remember:
Would love to hear from other educators who do these... or are planning to!
Miss Tracy xx
I have shared how I write my individual observations for portfolios and planning on here before but am yet to share group learning stories. I only started writing them this year but they are an incredible tool!
Most kindergarten classrooms ave a space where we educators post what we are doing in the classrooms and pieces of children's work to share with parents and caregiver. this was no different in my placement centre...
Featured on this board are two group learning stories printed on A3 paper and photos taken from the group experiences. Writing a group learning story, I feel, is quite different from writing them for an individual child.
Rather than focusing on the specific, I tend to focus on what all the children are doing, what they are learning, what they all have in common. I also try to include some individual responses, sometime included in the story or by writing/typing them out and sticking them up near posted story. This one was an example from the creek experience I set up earlier in the year...
As always, include lots and lots of photos! I cut mine off the bottom, but taking and selecting group phots is one of the most fun parts of writing these! These group experiences are wonderful to have but even better to document and share with families. Slightly adjusting how we write these isn't too difficult but the end result is completely worth the extra time and effort.
Some key things to remember:
- keep it general, try not to write about specific children or their responses
- chose to an experience where about 80% of your students were involved in, not just one or two
- linking to the curriculum framework is important so think of the learning that happens, what thinking did this inspire, what relationships are being built?
- link the chosen experience to how you will plan in the future - this is one of the most important aspects!
- display these printed stories in a well trafficked area and make the presentation appealing to look at - the point of these are to share what happening on the inside with the outside.
Would love to hear from other educators who do these... or are planning to!
Miss Tracy xx
Sunday, 24 August 2014
Placement - Planned Experiences Part 7
Hello!
The letter theme is a big help when it comes to structured planning
at this centre and during my full control time, the letter of the week was P.
Sensory play has so many benefits and purposes and the children absolutely love it! With this
is mind I went with making play dough with them, with some added extras…
I made the play dough with the children during their quiet
time, with each having a turn at pouring and mixing the ingredients. I had
arranged the invitation to play in the morning, selecting the following items;
pom poms, patty pans, pipe cleaners and paddle pops and decided to dye the
dough pink. Are you seeing a reoccurring theme yet?
I never made this theme obvious to the children, I never
mentioned why it was pink, the link between the additional items, not once. But
they were quick to observe. One child mentioned that we should make it purple because
purple starts with P. Another suggested earlier in the week that play dough was
a p word so we should play with it soon.
The children had a great time making and exploring with the
dough with this being the result…
The end result = a fun play dough experience with strong links to the children's interests and learning goals!
Miss Tracy xx
Sunday, 10 August 2014
Literary Discussions
Me again!
After the children on placement came inside from outside play, we would often sit on the mat and read a story to slow down before having afternoon tea. On day, we decided to A House For Wombats by Jane Burrell and Michael Dugan. I went through a book orientation as we discussed in EDLA this semester, going over the title, the front image and the author's name when I turned the book and...
THERE WAS NO BLURB!
...and the children in the room immediately noticed. We read through the book, which wasn't too bad, and talked about what happened in the story and what it meant when one child put their hand up and asked if we could write a blurb for the book. So I said yes!
We talked about what was important in the book and came up a list in which the children basically told me absolutely everything which happened in the story. After talking about how the blurb only tells the reader some of story, we whittled down the list after carefully considering each point and how important it was to the story and came up with the following list:
" she makes a house
the house changes
the house has stairs
the houses are different
the wombats fix the house
the wombats sleep
they sit on the couch
they had a cup of tea "
We were all happy with the final list and decided to print it out and sticky tape the list onto the back of the book so that future readers could read a blurb when they chose to read this book.
Miss Tracy xx
Posted by
Miss Tracy
at
9:00 am
No comments:
Labels
3-5,
author,
book,
child initiated,
children's literature,
discussion,
full control,
literacy,
placement,
spontaneous experience
Sunday, 3 August 2014
Graphing in Early Childhood
Hi all,
Inspired by this pin, I planned this activity during my full control period. Preparation included cutting out the pieces of paper and writing the children's names, adding a heading to the page and gathering your glue, scissors and permanent marker.
I sat the children down and began by talking about our other graphs and what we measured on them and what we were going to measure on the new graph. I placed the names on the ground and asked the children to come out one by one and see which one belonged to them.
They then stood out the front and counted the letters in their own name. I then cut out the individual letters and the children all called out what letter I should glue up.
After gluing the letters on, there was some discussion about who had the most letters and who had the least. We also compared whose names had the same amount and the same letters.
At the end, we counted up the letters in everyone's names and I wrote it in marker down the right hand side. After drawing in the grid lines, labeling the axis and underlining the heading, the final product was ready to be tacked onto the door with our other graphs...
This activity incorporated so many concepts including:
Inspired by this pin, I planned this activity during my full control period. Preparation included cutting out the pieces of paper and writing the children's names, adding a heading to the page and gathering your glue, scissors and permanent marker.
I sat the children down and began by talking about our other graphs and what we measured on them and what we were going to measure on the new graph. I placed the names on the ground and asked the children to come out one by one and see which one belonged to them.
They then stood out the front and counted the letters in their own name. I then cut out the individual letters and the children all called out what letter I should glue up.
After gluing the letters on, there was some discussion about who had the most letters and who had the least. We also compared whose names had the same amount and the same letters.
At the end, we counted up the letters in everyone's names and I wrote it in marker down the right hand side. After drawing in the grid lines, labeling the axis and underlining the heading, the final product was ready to be tacked onto the door with our other graphs...
This activity incorporated so many concepts including:
- graphing
- spelling
- counting
- information representation
- word recognition
- number recognition
- comparison and contrast
Definitely one to try out again, perhaps with a little tweaking for the primary placement...
Miss Tracy xx
Posted by
Miss Tracy
at
9:00 am
No comments:
Labels
3-5,
activities,
block placement,
full control,
implementation,
literacy,
make and create,
numeracy,
placement,
planned experience,
planning and programming,
second year
Sunday, 20 July 2014
Placement - Creating Environments Part 3
The Handwriting Table
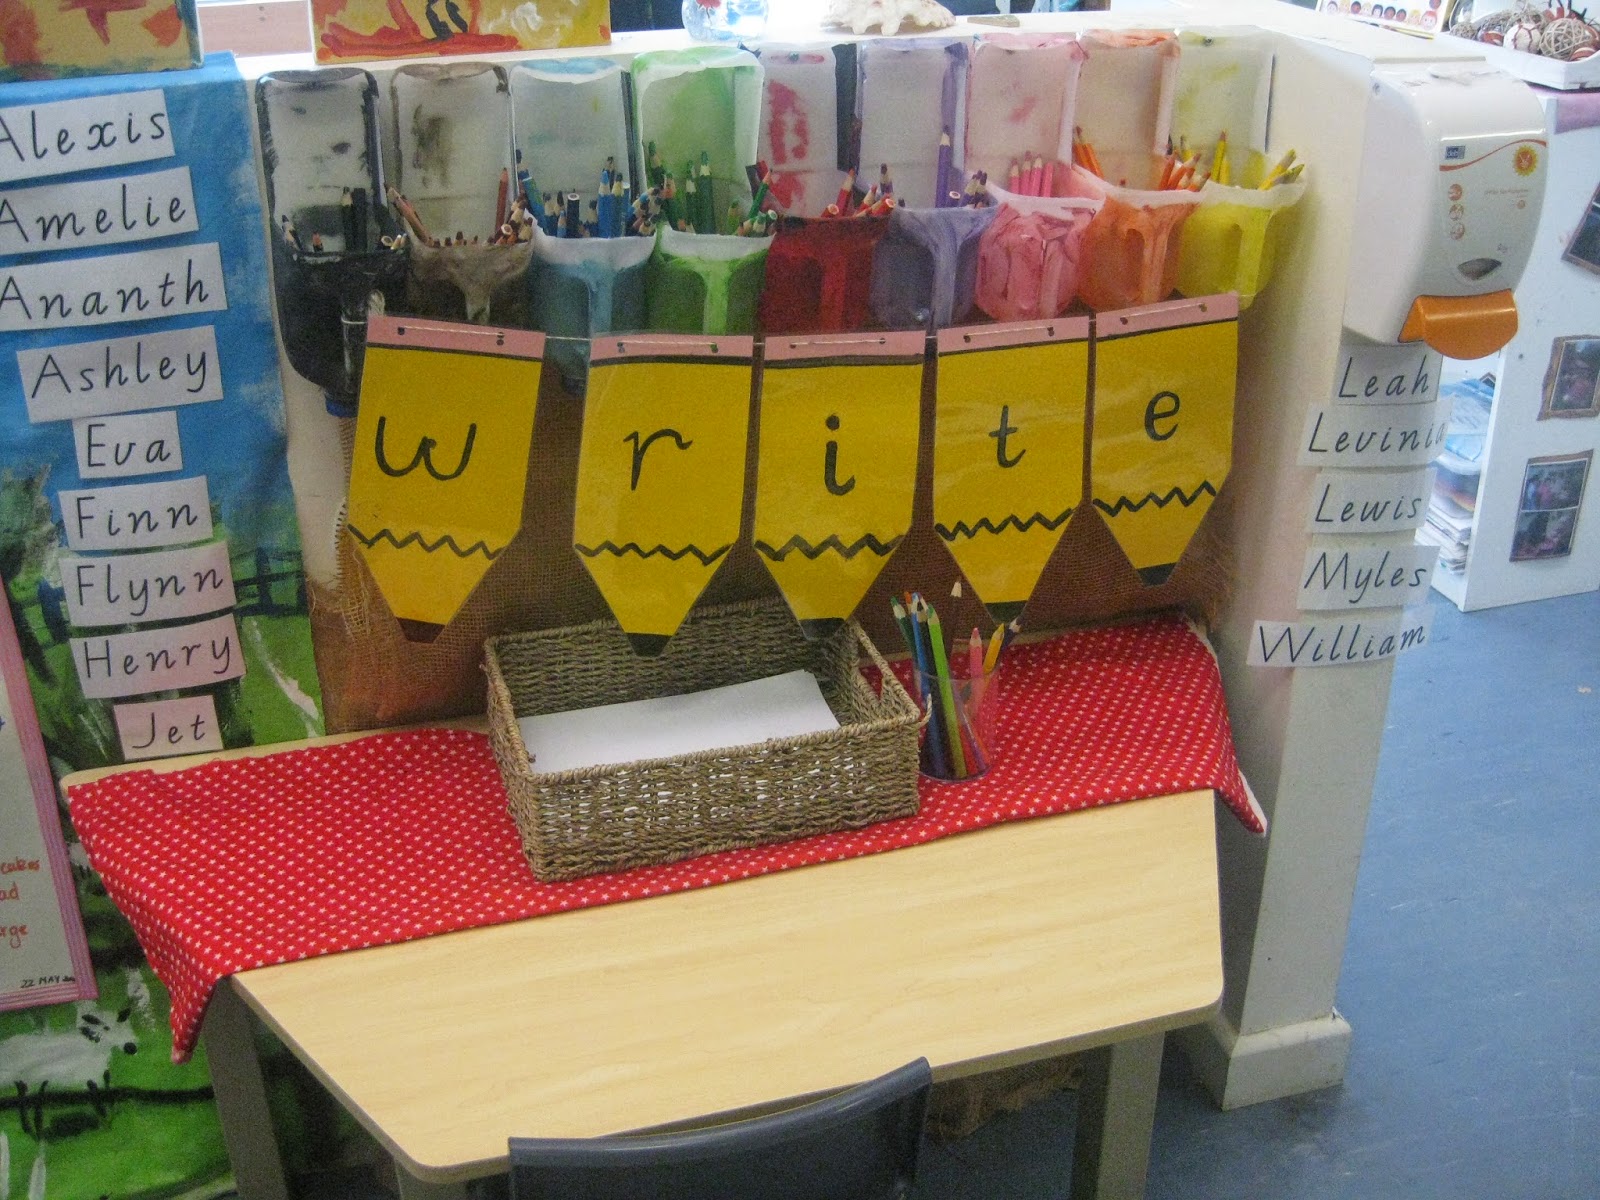
The children in the kinder room love to write. Some have mastered their names already and write it on every piece of paper they can get their hands on while some of them are still experimenting with what letters they can trace, draw and recognise.In knowing this, my AT and I have been doing everything we can think of to support this current interest of theirs. When choosing the order to wash hands, put on jackets, get place mats etc. we draw a letter or a name on the board. Some children knew their names and others while others had more fun sorting out the false names from the real ones. During my full control week, I asked the children what their favourite letters were and why for their morning minutes questions and I received some very thoughtful and insightful answers.
When it came time to change one of the activity tables, I had the perfect idea; a writing table!
I got the idea for the banner from here but cut out yellow and pink paper instead and painted on the letters. After laminating, I used a hole punch to punch holes (duh) and strung it up using twine. I had to redo some pencils so that they could match so for your convenience and found at the bottom of the post, I have made a template that you can print out and either write, type or paint the letters onto. The milk carton pencil holders were my AT's idea and sorts out the pencils by colour. After placing the banner up, setting out a tablecloth and some paper in a natural tray, I set to work on the most important part, the names!
The Victorian Modern Cursive Script font is the best tool you could have installed on your computer. It is the font used in Victoria to teach handwriting and to create handouts, posters, practice sheets...you name it, you can type it with this font! I used the holy grail of fonts to type out the children's names and placed them up around the table with Velcro. I decided on Velcro so that they could recognise and pull off their own names should they need help to spell it or what the letters look like, and then place them back when they were finished.
From the email I received from one parent, "F has asked me for paper and pencils so that he could write his name at home but when I got it for him, he said he needed the table and the banner to write," the children really enjoyed the new edition to the room and what they can do here!
Posted by
Miss Tracy
at
9:00 am
No comments:
Labels
3-5,
block placement,
creating environments,
did it myself,
download,
eresource,
freebie,
full control,
literacy,
placement,
second year,
series,
stationery
Subscribe to:
Posts (Atom)