Sunday, 25 May 2014

Placement - Creating Environments Part 2

What's the Scoop?

Following the success of the play dough ice cream, I thought about adding something a little more permanent to the centre's home corner.  Following the find of this pin on Pinterest, I found a way to use the utensils I had bought for the play dough and further extend on the previous sensory experience. After collecting the materials, I set to work. You will need ping pong balls and some appropriately coloured wool or yarn.

They are so simple to make, simply sticky tape a piece of coloured wool to the ping pong balls and wind the string around until you have can't see any of the ping pong ball colour. I used a total of 24 balls but feel free to make more or less depending on numbers in your room. I would suggest wrapping the wool super tight and tying it off really well as some of the children managed to unravel the wool or break the knot I had used when trying to pull the ball out of the cones.


Besides these, you can find everything else in-store. I picked up the ice cream scoops from Kmart for only $2 and the porcelain cones from Typo, $3 for 4. If you can make it to the Southern Cross Station DFO, Melbourne, there are currently sitting on the sale shelf!

I set the environment up before the children could arrive, so they arrived to this scene...  


Plenty of play ensured...


This was one of the best environments I have had the pleasure of setting up. It was so easy and simple and yet the children found such joy and happiness when they were engaging with it. The staff were equally impressed, at the set up and the materials used to create this set up.

This is definitely one I will be saving to use again, in my own classroom!

Miss Tracy xx

Sunday, 18 May 2014

Placement - Creating Environments Part 1

Creek Explorers

If there is one thing I have noticed about the children in this kinder room, it is their love of exploring and how much they love playing with water. Last week, after days of rain, a large puddle formed over part of our playground. While did this pose a safety threat due to its size and depth, the educators cornered it off and allowed play provided that the children didn't put their hands or feet in the water.

One of my focus children, W, used a garden rake to play with this new attraction. He skimmed it across the water and watched the patterns it made. When I asked him what he was doing, he told me his was fishing, and that all the fish went into the bucket, the large bin we use to store the sand and water toys in.

I pondered over this observation throughout the week and used what I had seen as the basis for my next implementation; a creek environment where the children could explore a small ecosystem. 


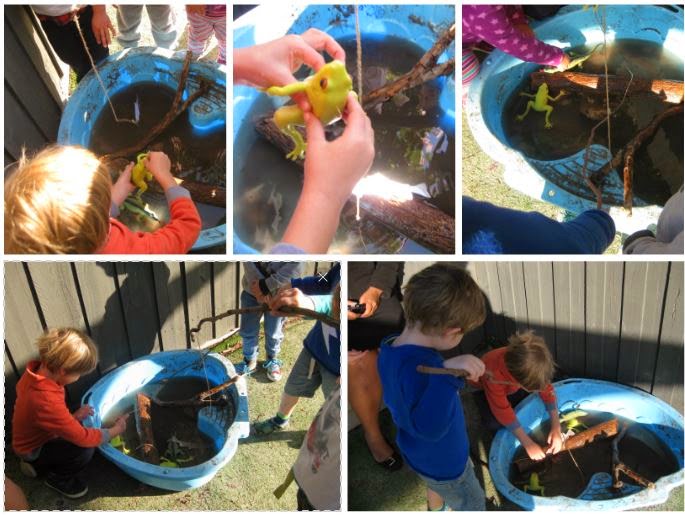
After filling the bottom of the container with various sized pebbles and filling in one-third full of water, i began to arrange the elements of this environment. I purchased the frogs from my local dollar shop, along with the lizard. I foraged the park across from my house, and the kinder store room, for the large logs and twigs. After attaching some twine and a hook shaped paperclip to the long twigs, I had two fishing rods.

Accompanying the creek were some small fish! I printed and laminated images of trout and attached them to paperclips, so that the children could link the hook and the paperclip to catch the fish. Below is a link to the document that you can laminate to create your own fishing experience! In the end, I added a total of 8 fish.

The children were so excited to watch me put this together! By the time I had finished, they had already picked up the frogs, experimenting with how stretchy they are and who was too scared to even attempt touching them. The fishing rods worked great, however I wished I had made more so that more children could fish simultaneously with out too much conflict. Had I the money, I would have acquired a container which looked more natural, but I made do with what the centre already had.  

Some images of the little explorers...


UPDATE 28/05/2014 - The water, if not changed regularly, begins to smell and can be dangerous if accidentally ingested. If you plan on having this environment active for longer than 7 days, ensure you change the water as soon as you notice any changes.

Miss Tracy xx

Wednesday, 14 May 2014

Style File - Placement Day 8

Jacket Forever New $89.95
Top Forcast $7.50
Skirt Temt $15.00
Shoes Famous Footwear $19.95
Bag Forever New $89.95

Miss Tracy xx

Sunday, 11 May 2014

Placement - Planned Experiences Part 3

Play Dough Ice Cream Parlour

The girl:boy ration in my kinder room is little off on Wednesdays, with only 3 girls to about 8-9 boy, While I don't mind hearing about the coolest Teenage Mutant Ninjas Turtles and having cars flying around the room, it does mean that sometimes the home corner is left a little empty and lonely.

Taking this information and my observations of L, one of my focus children, I searched for a play experience which draw some more attention to this area of the room and yet still be of interest to all of the children. And what do all children love...ICE CREAM!

I was inspired by this pin from Play Create Explore. After consulting my AT about the ingredients, as some centres have strict no food planning policies, we both came to an understanding this activity would be great! I also received some important information about certain children in the room who had a love of eating play-dough and began to prepare accordingly...

Dough Recipe

2 parts cornflour
1 part hair conditioner (any brand will work, I used a cheap brand brought in bulk)

Mix together in large bowl until they form a sticky kind of dough. Remove it from the bowl and begin to knead an work it on a lightly dusted table until its smooth and dry to touch. 


For the separate flavours, split your prepared dough into three (or make another two batches depending on how much you want) add the following ingredients:

Vanilla - 1 cap vanilla essence 
Strawberry - 1 cap pink/rose food colouring (or a few drops of red), 1 cap of strawberry essence.
Chocolate - 2 tablespoons cocoa powder, 1 cap chocolate essence

For the play experience, I prepared the dough the night before, placed it in some loaf tins and added ice cream scoops. By using the scoop a few times over the prepared dough, it begins to look more like ice cream than when you roll in out smooth. I also added some toilet rolls for ice cream cones, red wishing stones for cherries and fine wood wool as sprinkles. I would have loved to have made some rainbow coloured rice for sprinkles instead but there's a no food policy!

This was the result...
When it came time pack up, since all the flavours had "melted" together, I collected the remaining dough. The test batch I made on 3/5/14 is still going strong.

I found wrapping the dough in plastic wrap and storing in an air tight container works best. When you're ready to use it again, knead it until smooth and if it seems a little dry or brittle, add conditioner 1 table spoon at a time until you reach the desired consistency. 

I was so thankful to have some lovely volunteers help me to do the washing up as well!
The experience was well received by the children, as shown by some of their responses:

"Look at this rainbow ice cream!"
"Can I have another cone?"
"I made a super fat ice cream!"
"Look at my ginormous one!"
"This one smells like chocolate...I need sprinkles. Can we make it pink again?"
It's a rainbow ice cream; it has white, brown and pink!"

It's definitely one to keep and try with your kids, let me know how it all turns out!

Miss Tracy xx 

Wednesday, 7 May 2014

Style File - Placement Day 7


Coat Target $19.00
Top Temt $10.00
Cardigan Target Essentials $10.00
Pants Target Essentials $10.00
Shoes Famous Footwear $19.95
Bag Equip $19.00

Miss Tracy xx

Monday, 5 May 2014

What's in the Box?


Rocket, spinach and cucumber salad with French Dressing
Moroccan veggie burgers
Fresh snowpeas 

Miss Tracy xx

Sunday, 4 May 2014

Placement - Planned Experiences Part 2

Garden Sensory Box

Every week in our kinder room, we have a letter focus and last week's was the letter 'G'. We listed all the words we knew which started G and my AT set up a grass growing station where the children could see mustard and fennel seeds grow. We have also been changing the vegetable patch outside and planting some flowers in the barrels.

To support these changes, I thought a garden sensory bin would complement what the learning environment and the current interests of the room. After discussing this, I began working on putting the environment together. 

I got the inspiration for this environment from this post and began collecting the materials: 
  • Two 6 egg cartons 
  • Green pipe cleaners
  • Paints
  • Envelopes
  • Coloured paper
  • Popsicle sticks
  • Got glue gun and sticks
  • Pebbles 
  • Laminator and sheets 

First step was cutting up the carton, by the end of it you should have 12 little 'cups' and make sure you save the lid for a seedling box. I cut up 2 pipe cleaners to make 12 little pieces, folded in half to make the 'V'.  You can paint the cups whatever colours you like, I chose these because they matched the colours of the vegetables I picked. 


Once the paint has dried, cut a little slit into the tops of the cups so you can poke the pipe cleaners through. To make them look a little cuter, I curled the tops on a pencil. And there you have it, little vegetable seedlings!


Next up is the planters. Introducing the first LMST freebie, which can be downloaded below, just print out the page, laminate it if not printing on card stock, and glue them to the popsicle sticks.


To make the seed packets, you can download the labels below and print onto coloured paper. Then glue to the envelopes. I filled mine with pebbles and glued it shut but depending on the age group of the children in your care, you can use bigger/smaller articles and chose whether to glue it shut or not.

Add a couple of child sized gloves, a watering can, some small gardening tools and there you have it - garden sensory box! Don't forget to grab some small pebbles or coloured sand for your 'dirt'.

The final product looked great in the room and the children loved it! It was super easy to put together and was an opportunity to recycle some of our household waste. It was a perfect opportunity to link to my AT's learning focus and I am so happy with how it all turned out.

As for the children; loved it! Bringing the dirt and nature into the classroom really opened up the chance for them to get excited  about planting our veggie garden and adding some greenery to our playground. The biggest hit has been the gloves but since there is two chairs at the table and to gloves, some opportunities here to practice their sharing skills. The amount of collaborative work that happens at this station is phenomenal!


As promised, you can download the templates below, the very first LMST free download with only more to come!